 |

01-24-2013, 01:07 PM
|
 |
|
|
Join Date: Dec 2012
Location: Wainwright
Posts: 4,499
|
|
 Bow Tuning Guide And Set-up Tips !
 ...Hey gang ...Sorry if this has been done before...but lets start up a Bow tuning and set-up Tip thread...that we all can contribute to and maybe learn something...I learn something new every day in this archery/bowhunting sport.
I have a few of these on the Mathews forum this first one has amazing 83677 hits on it so it shows it is being used...
L.O.S.T. Arrow Archery
Bow Tuning/Set up Mathews
This tuning guide is just that a guide these are methods that have been developed by myself, and combined with methods by other knowledgeable people
I use these steps in my archery shop and have great success with them, every shooter is different and methods may vary, use what is best for you.
Above all enjoy our great adventure we call archery and Bowhunting.
**********************************
1) Loosen limb set bolts on each side of bow on all bows that utilize limb pocket locking bolts-Tighten limb bolts to max-all Mathews specs are with bow to max.
2) Place bow in bow press bow shelf/rest towards yourself.
3) Recording all measurements in the next steps will assist in understanding movements in different stages of tuning to bow specs.
4) Measure ATA [Axle To Axle], using tape measure or metal yard stick/straight edge, measure ATA from OC [ON Center of axle to Center of axle].
5) Measure BH [Brace Height]-BH is from string to center of Berger hole or threaded hole on shelf that rest bolts to, most stock bow grips will have the same measurement from the deepest point on grip.
6) Record CT [Cam Timing]-Older Mathews have two alignment holes in cam-take two 3/32 pins or finish nails with points grinded, edges bevelled and smoothened with fine sandpaper, and place into alignment holes.

Newer Mathews have Alignment windows...Cam Alignment Tuning with Mathews bows with Alignment or timing window
tune so string is slightly below center with cable...as when string/cable settles it will fall center
an untuned bow or under twisted string will show string HIGH in window.

7) Level bow by Placing small level on string of bow only sitting in press, then place level on pins to check CT is also level,
-Or as I do and prefer as I feel it is more accurate -place yard stick/straight edge on pins running full length below string, CT will be evident if out.
8) Check IWL [Idler Wheel Lean]-place Straight edge/yard stick flush on left side of IW [Idler Wheel]-run Straight edge along string to nocking point, edge of straight edge should be approx 1/8 from string shelf/rest side.
*NOTE for Reezen and Monster do not use small holes use the large visual alignment hole thru cam on cable.
9) With bow in press [approved for newer parallel limbs] with shelf/rest towards you, relax strings and cables, Note Most bows require limbs to be let down several turns for pressing.[ Example- Drenalin = 5 turns]
*Exceptions...The XT and Prestige have course threads so only 2 1/2 turns, DXT, Dren etc have fine threads and about 2# per turn, so approx. five turns.
You can back your bow down ten pounds from its advertised limb weight. 70# limbs down to 60#, even if it came at 74#. There is enough bolt to go the ten pounds.
The Ignition can go eight full turns, or about 15# down
10) I press some bows with limbs maxed for faster and easier spec tuning, However it is recommended to turn out bow limb bolts on most models for pressing.
-all tuning adjustments for other than rest will most likely require twisting of strings or bus cable and cable yoke or Y harness clockwise or counter clockwise.
STEP ONE
11) Start with ATA-press and remove Y harness loops from IW, while loops are removed I remove QCCs - [Quick Clip Connectors],
-A light sanding with fine sandpaper[400 grit] on bow side of QCCs -wipe clean and spray dry powered graphite on axle and QCCs-this eliminates future creaks and draw clicking noises.
*Note remember to align slot of QCC's towards cable or yoke when re-assembling
12) Remove all twists from loop yokes and twist counter clockwise if facing bow, for Mathews stock strings I twist 12 complete turns on the bows right harness yoke and 9 turns on the bows left side, this will vary from bow to bow, do not over twist.
For Worlds Best Strings-- if standing behind Idler wheel-I twist left side yoke 5.5 clockwise and right side 2.5 twists clockwise to start, if standing on bows shelf side thats 5.5 on bows right side and 2.5 twists on Bows left side--as Worlds Best strings cables have loops served as all strings should.
*With new Reezen stock strings are 2-3 twists on bows left and 7 on bows right
With Worlds Best start with 4 Left and 8 right
*Update on the Z7 yokes...since they have loop ends served.. they have less twists...on average we found they were aprox 7 twists to bows right and 4 twists to bows left ...for a starting point..again string should run straight with idler string track at full draw for correct idler lean..
If yokes twist on themselves, one can remove one yoke and untwist from other yoke, if more twists are required in cable untwist a couple extra twists in yoke.
With unserved loops, [all loops] twist loops in themselves to make stronger loops.
13) Reattach harness loops, then remove cable from cam end and twist to achieve bows ATA specs-example-33 OC for SB [Switchback] and Drenalin and 31 OC for SBXT -.
14) Twisting cable clockwise results in reduced ATA, [also at same time increases BH and CT towards string]- if ATA is over specs 2 twists for every 1/16 over.
15) Counter clockwise Twists result in Increased ATA- [also decreases BH and brings CT towards riser.
16) Once ATA is accomplished record # of twists + what direction as string may need twists to fine tune CT and/or work with ATA.
STEP TWO
17) Once ATA is at spec-CT alignment is adjusted via twisting both ends of string equal on string- [which also balances string to help stop peep travel].
18) I use plastic clothespins to hold string on wheels and cams when bow is relaxed, which holds them in place as I work on it.
19) If inner timing hole on cam is down towards the riser, twist the cable, if inner hole is towards the string twist the string, Twisting string clockwise moves alignment line toward riser- [also reduces ATA and increases BH].
20) Twisting string counter clockwise moves alignment line toward string [also increases ATA and decreases BH].
21) If bow is extremely out of specs twist 2 each string end for 1 twist of cable to start.
STEP THREE
22) Idler Wheel Lean- most Mathews with normal string settlement The idler wheel top will tend to lean to the bows left side when held like you were shooting, when bow is relaxed it will look like it is leaning bows top left...but that is slight pull from roller/cable guard,
Idler wheel lean is checked at full draw
To correct for example Idler Wheel top leaning to bows left.. add twist to Bows right harness loop to adjust IWL straight at full draw, -[bows left loop for Idler wheel top.. right lean]
23) Using straight edge/yard stick measurement, twist until edge of straight edge placed on Idler wheel, at nock point is approx. 1/8 outside the sting facing you- [Bows left side of string].
24) NOTE*once string is at full draw string and idler wheel will line up in a straight line- with bow relaxed the idler wheel will appear to have a lean due to the cable guard pull.
25) When bow is full drawn, string should run in a straight line with idler wheel, if straight edge was placed on idler wheel.
26) Additional twists may have to be made on cables and both ends of string to achieve all steps to specs-remember every twist effects all other specs, also twists to cable and string will effect draw weight and draw length.
27) Once factory specs are achieved set center of rest 13/16 [11/16 for some Drop Away Rests] from riser at Berger hole, with arrow on string and rest, arrow should line up center on Berger hole.
28) Reset nocking point approx ¼ above 90 degrees from bottom of rest and readjust kisser and/or peep.
This method once done a couple of times is quick and seems simple once understood, the bow results are a quite, smooth drawing bow that punches tackspaper tune or Walk Back tune for final tuning and applying broad heads.
Peep Sights
Always press a bow when installing and working with peeps...we get more broken strings for peeps than any other reason
Most strings are manufactured twisted clockwise or to bows right...since most strings are now Z twist and two colors that dictates where peep is placed in string...between the two colors...
Once a new string is shot it immediately creeps or stretches [regardless of what manufacturer states..all strings stretch some more than others due to construction]
As the string stretches the peep may want to move/rotate clockwise with the string...or in some cases counter clockwise to bows left pending on how string was installed to start...
Note* installing serving to peep will rotate string slightly also so its a good idea to serve before adjusting..
An 1/2 twist opposite to peep twist to string will usually bring it back on...without any major bow spec change..however a few 1/2 twists may be needed to align...
Therefore since peep rotation is a sign of string creep [stretch] it makes sense to twist string clockwise to re-tune bow spec's ...
.With a two color strand string that is rotating substantially .....one can twist string clockwise twists so peep has rotated itself completely 1/2 turn...which will require removing peep now backwards and simply turned around...
If peep was twisted to bows left ...1/2 twist clockwise should align it without having to removing the peep and turning it...
However even if we ideally would want to twist the string clockwise ...if a peep is only slightly off one can twist a well tuned bow opposite of rotation 1/2 turn to align with out messing up specs..
On a solid color string if peep is considerably rotated one can simply remove peep and situate peep aligned back in equal strands without twisting string...
Loop should be rotated also to follow peep..a perfect alignment is when both peep and loop are straight away from bow toward shooter even at rest...
Or if that doesnt work
Relax the string again. Look carefully at the direction of the string twist. For example, if the normal twist of the string is clockwise, and your peep must move to the left a ¼ of a turn, take two strands from the top left side and flip them to the bottom right side. Then take two strands (make
sure they arent the same two strands) from the bottom right side and flip them to the top left side. This will pull the peep over to the direction you want.
If you want to move it the other way, just do the same steps in the opposite direction. Note: more strands will mean more movement.
Shoot the bow to re-settle the string and repeat as necessary
This for me is the easiest and most stable

*Thank you to who it was that did this chart up for and sent it to me
-May all you arrow fly straight and true.
************************************************** ********
* NOTES *
*-Removing a bow grip may appear to add up to ½ -¾ to your draw length or anchor points.
*-To adjust Cam alignment slightly, twist cable-ATA wont move measurably.
*-If inner hole is tipped towards riser twist up cable and if inner hole it tipped towards bow string put equal twists into the string on each side of the cam......NOTE: limb bolts must be max down to check and or set this
*-Twisting cable clockwise will increase poundage.
*-String and cable stretch or creep will decrease poundage and increase draw length.
*- Apply Super Glue on all serving ends on a bow right out of the box-also apply glue to the couple of inches of serving near the Roll over of the cam-This will forever prevent serving separation.
*Do NOT use bow wax near servings that contact cam/wheels. May cause build up, abrasion, and cause string to ride off cam/wheel.
*-Dry graphite powder should be used in place of all oils, greases, etc on any moving parts that need lubricating on a bow- string wax, light vegetable or scent free synthetic oils can be used on bolt faces etc -that show rust.
*-Dry graphite can be bought at locksmith supplies or some hardware stores in a rubber squeeze contamination with a needle nose spout.
*-Backing poundage off- takes pressure off of the string in turn causing it to simulate a longer string length which increases the draw length ... one of the reasons a lot of people suggest shooting a bow maxed down in poundage.
*-There are couple of important reasons for putting twists in a string /cable.
1. - Twists stop the string from opening up and thrashing around during the power stroke.
2. twists help out balance of individual strands and the string itself.
3. - "On a standard compound bow, initially 10 20 twists is a suggested range.
If you use a material that does not creep, no further twisting will be required. [no such material :whistle ...Neil]
Obviously on single cam strings, more twists may be required. The recommended range is 20 40. "
As most know-twisting a string/cable allows fine adjustment of length, Bringing bows to manufacturers Specs.
At one time manufacturers recommend around one twist every four to six inches - approx only 15 twists in an average compound string, but strings were much shorter than.
Lately many well known string manufactures and top archers tell us to use far more twists than this - usually around 1 -1.5 and max at 2.5 twists-per-inch.
This is to increase speed and help consistency and bow tuning.
Also a string with hardly any twists is slow and NOISY..as there is a flatter area and resistance.
*Caution strings/cables can be over twisted putting overdue stress on them.
*When feeding new string/cables on bow feed string onto black roller on roller cable guard, cable feeds onto shinny aluminium color roller.
* Limb Bolts
.XT and Prestige have course threads so only 2 1/2 turns Max, DXT and Dren have fine threads and about 2 Lbs per turn, so aprox. Five turns down max.
You can back your bow down ten pounds from its advertised limb weight. EX
70# limbs down to 60#, even if it came at 74#. There is enough bolt to go the ten pounds.
The Ignition on the other hand can go eight full turns, or about 15# down.
*When paper tuning- A left tear and no matter what you do it won't go away and the arrow is spined correctly, you can set the center shot about 11/16"-13/16 from riser to center of the arrow shaft and/OR try put a few twists into the bows right side of the yoke ..1/2 twist at a time..max approx 2 twists as it moves quickly
check for possibility of miss-tracking string on idler if moved to far.
* When paper tuning [Mathews/solo cam Bows]-if results are a continual HIGH tear
no matter where you move/adjust nocking point...that is a result of a weak spine/arrow..Use stiffer spine/arrow.
*Dont paper test from a bow with a new string and a tight nock...shoot and enjoy a bow and wear in the string before re- tuning bow to spec and paper tuning-A tight nock on a new string will give false or erratic readings.
*Your rest location should dictate arrow length.
The most forgiving setup is the rest contact point at the berger hole (which is 1 3/4" less than the bow's DL). The arrows then should be cut 3/4-1" infront of rest contact, putting them about 1" less than the DL.
* When tuning broadheads, and they are hitting to the right of field points for a right handed shooter, that indicates a weak spine reaction
Try turning the DW down and see if the broadheads move closer toward the field points.
*Excessive bow torque related to having too much bow hand on the grip can cause erratic tears.
*A test for under spined arrows is simple..Temporarily lower limb bolts several turns and try paper tune again.
*Twisting Strings-When the bow is in front of you in a press or maintenance center ...the common tech method is cam to your right and Idler wheel to your left..looking at string/cable from behind the cam..Bottom of bow..rest to left cable guard to right...string/cable are twisted clockwise...standard procedure that keep servings tight.
*When checking for Idler lean-- draw as one would shoot.... arrow nocked with release,- anchored...have assistance watch or use straight edge behind you...wheel straight line with string at full draw.
*For an arrow tuning guide use..
http://www.eastonarchery.com/pdf/tuning_guide.pdf
http://www.papertuning.com/
When using charts for arrows
IBO speed of less then 260 is considered a Soft Cam
IBO speed between 260-290 is considered Medium Cam
IBO speed of 290-320 is considered Hard Cam
IBO speed greater than 320 is considered X-Hard Cam
Update on new Reezen,.. all above remains the same as others
with the following change if custom strings are involved
the String Grub which weighs 33.0 gr can be removed by sliding off stock string
use a small long cotter pin put on top yoke loop slide Grub over pin and onto new string
place ¾ from suppressor.
* Grubs and distance from rubber suppressor
-Reezen ¾
-Monster Top and bottom 2
-Z7
1
-Xtreme
1/4
- Mag
1/4
- EZ
None
* Installing Cat whisker type silencers on string may/will prevent string from jumping suppressors, new design suppressors eliminate this problem.
* E Clips are 3/16 on all Mathews bows
NOTE* There has been a limb twist issue with DXT and Reezens
if the bow all of a sudden doesnt paper tune and/or is erratic have your dealer check for limb twist
or as some call it CAM lean
Place an arrow along flat surface of CAM
the arrow should run straight with string ..If it does not.. the cam may have bad bearings or it is Limb Twist.
Monster update
Tune as solo cam..only as a double solo.. Its exactly like spec tuning a solo cam but on each end..ha ha, the AVS system takes care of itself
keep ATA in spec as normal, but you have two cables to work with do them equal.
*Cam Alignment
see below.
your looking for the cams to rollover in time, synchronized or the same together..
-In more specific detail
First the bow should be in Mathews spec, ATA, BH, nock point
To true sync (time) the bow, it needs /should be at full draw. You will need a nocking point established, The cables on both cams need to drop into the draw cam/mod track at the same time, or synchronized . . (the draw mod/cam is the smaller track that the cable feeds into.)
The Monster has the timing windows, which are close on many, the cable is centered in the timing windows...
at full draw adjust by twisting cable/string until both cams are in time or roll over synchronized ...
mark in timing window with a white marker where cables run thru when timed...this will allow reference when bow is relaxed
as long as string/cable have settled or stretched....weather, temperature can still effect strings further...
duel cams were once a pain to keep timed or synchronized ...hence the ingenious invent of Solo cams...
however the Monster is simple as far as duel cams are concerned..
As I mentioned earlier the timing windows are a good indicator for timing as bow was timed at Mathews factory..
.and this procedure may be to much for the average shooter...your Mathews dealer will make it a lot more simple...we re-time all Monsters that are sold here that are brought in for the standard re-tune when strings settle at no charge...
Tune bow as you would solo cam, paper, walk back etc
*Cam Alignment Tuning with Mathews bows with Alignment or timing window
tune so string is slightly below center with cable...as when string/cable settles it will fall center
an untuned bow or under twisted string will show string HIGH in window.
*All Mathews Bows
Technical-Specifications Chart..
http://mathewsinc.com/content/upload...ions-Chart.pdf
*How fast is your bow
Take rated IBO
IBO speeds are based on a bow with a 30" draw set at 70lbs shooting a 350gr arrow.
-For every inch of draw length you go down you will lose 10 FPS
-For every 5# draw weight you go down you will lose 10 FPS
-For every 3 grains of weight your arrow is over IBO ( 5 grains per pound) you will lose 1 FPS
-For every 3 grains of weight you add to your string you will lose 1 FPS
On most Mathews latest models set center shot at 13/16 from riser arrow on rest centered on berger.
Some of the new models have thick center serving and will cause a left tear in paper
reserve with .21 BCY
* With HeliM like any bow check roller guard and Dead Stop set or lock nut/bolts for tightness as they may loosen up with shots out of the box new... Blue lock Tite can be used for better set
May all your arrows fly straight and true.
Neil
__________________
 APA AIR APA AIR
|
01-24-2013, 01:19 PM
|
|
|
|
Join Date: Dec 2012
Location: Wainwright
Posts: 4,499
|
|
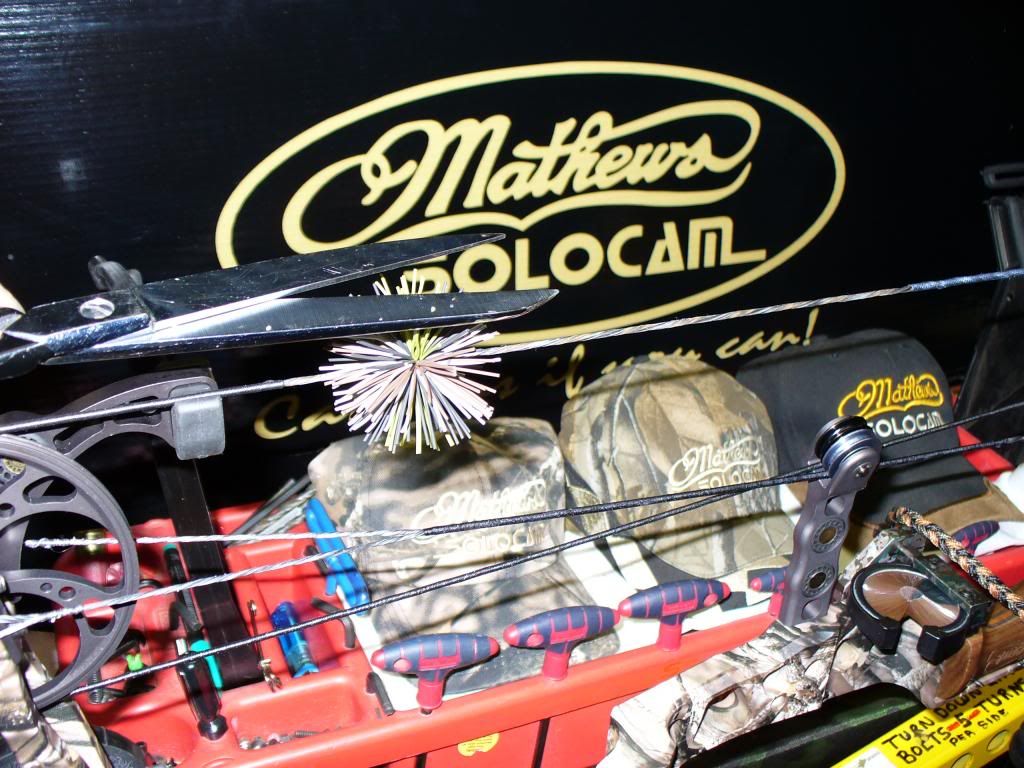
Hey folks, I have seen a lot of questions lately on whisker type string silencers, do they work, how to tie them, where to tie them etc, so I will try to answer some of those questions.
Whisker type silencers are not for everyone, you won?t see them on most target or 3D shooters bows, and/or on the ?Speed Freak? hunter bows either :shock: .
Reason being is they add a few feet per second loss, do they work well enough-to compensate for speed loss?, all my personal bows will always wear them, however I am into power hunting, where silence over weighs a couple feet per second any day :thumbup .
There are other types of string silencers on the market, however they have the same speed loss and break very quickly.
Mathews Bows are already extreme quite with their built in string suppressor system, however with a set of whiskers a shooter will hear a extreme difference again ?pure stealth.
If you think you don?t need them, try them, then decide. :thumbup
The whiskers I have in stock are custom made by ?Apple Archery?, and hands down are the best in the archery industry; they are designed with strength for today?s modern fast bows.
The older types on the market start breaking in little as a dozen shots; where as ?Apple Archery?s? whiskers will last the lifetime of the string, they are tuff and durable.
The whiskers sold by Apple archery are in only Black, I had mine done for the shop in bulk custom colors, black, green, brown and gray.
http://www.applearchery.com/
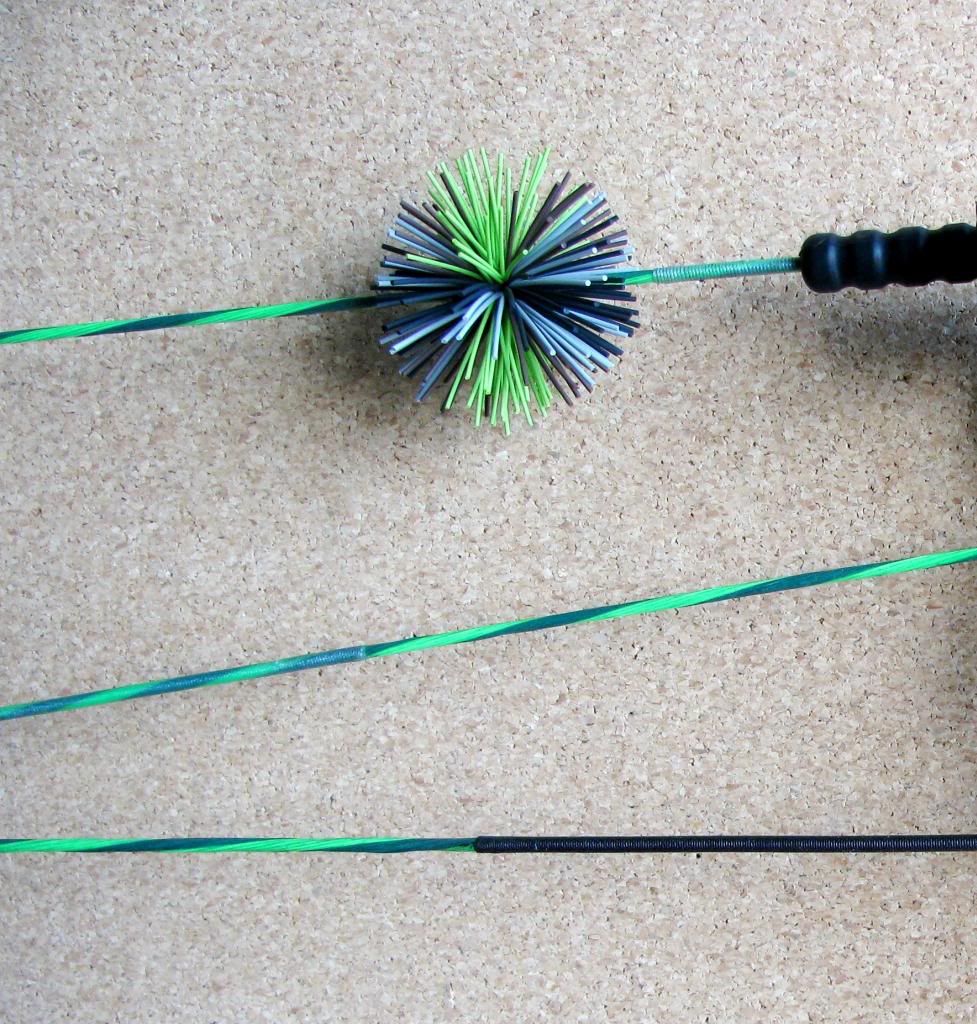
When bought by the package they will come by the pair approx 5 inches long, I cut the 5 inch in half and use the four 2 ? inch strips for my whiskers.
1-2-3 or four strips may be used, the more you use the more effective they are and complete a fuller whisker.

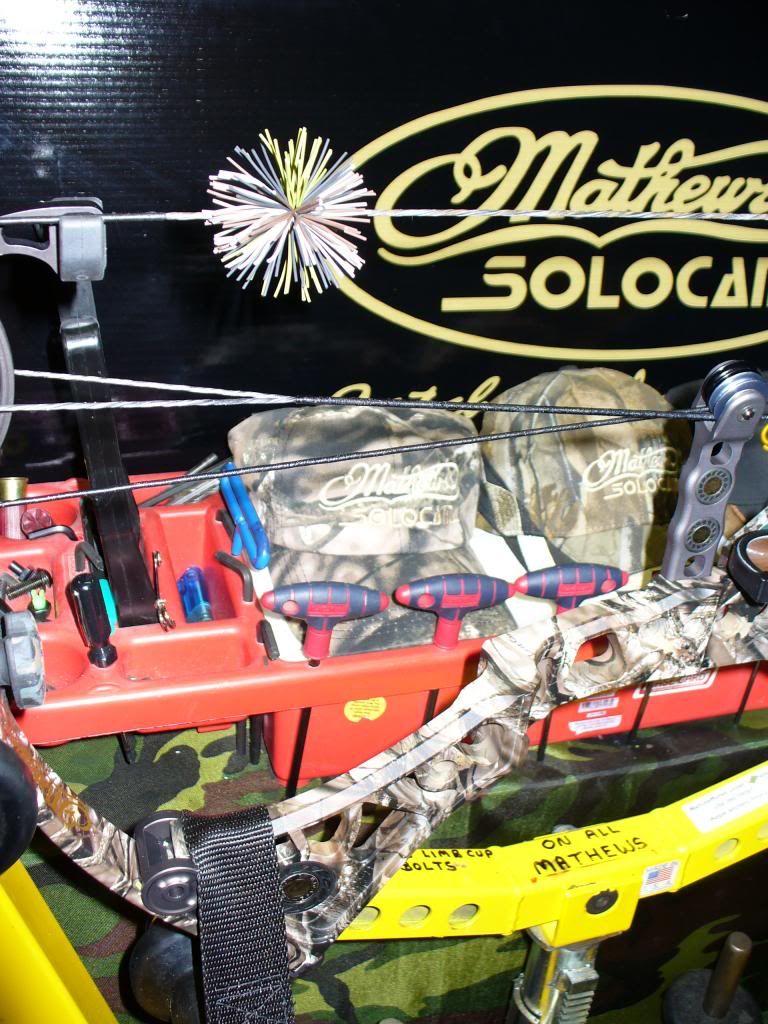
The whisker will sit approx 2 ? to 3 ? from top string suppressor and 3 ? from bottom suppressor, with the DXT they need to sit at 2 ?, which allows a clear sight pin view without obstruction, longer ATA bows can be set lower, just make sure a clear view of sights is clear at full draw.
I have measurements for certain bows on different bow squares, measure and mark string, this is where your tied in whisker ?stop? will seat and prevent whisker from moving downward when shooting, elsewhere they suggest a drop of Super Glue on string and slide the whisker into place, believe it or not I don?t suggest it.

With bow under slight pressure I use my starter string separator [large diaper type pin] and insert string/serving material, thru center of strands, and tie onto string using a ?Constrictor knot?, a knot I use constantly in my Wilderness Survival Courses and other wilderness adventures, best outdoors knot going.
http://en.wikipedia.org/wiki/Constrictor_knot

Finish Constrictor knot with a triple loop and single loop knot [surgical]-cut just under ? and with lighter melt ends together and push into main knot body to form a melted locked knot.
Warning* Do not allow flame near string or allow knot material to burn close to string.

Fold Whiskers over string and use trusty plastic clothes pin to hold whisker on string

Tie whiskers on using constrictor knot and finish with the surgical knot cut and melt end as in tied stop.
Caution* It is suggested to use leather gloves to tighten knot severely


I have a 7/8 inch mark drawn on my clothes pin ?I use it to mark ends of whiskers to be cut-from center to both ends.

Then cut whiskers with sharp scissors

Then fluff whisker out by pulling on whiskers, most can be separated quickly just by pulling on ends, whiskers will fluff even more after several shots.

Use scissors? to trim to desired size and even out, some may like the whisker that size or even trimmed down smaller.


End results will be a trouble free whisker that will last the life of the string, and considerably lower the bows noise that much more. And HEY they look good, make you look like a hunter not a gulldarn paper shooter ha ha.

Sorry about the quaility of the pics-done them quicly by myself.
:thumbup
Neil
__________________
APA AIR
|
01-24-2013, 01:25 PM
|
|
|
|
Join Date: Dec 2012
Location: Wainwright
Posts: 4,499
|
|
SERVING SEPERATION
There has been a lot of talk about stock strings and cables lately-once more on many bows.
However there has been an issue with cable serving separation and mention of string "stretch" or "creep".
*FACT*-All strings/cables regardless of manufacture will "creep" and "settle".
Aircraft steel cable will "creep" and settle under the same stress and use.
However the big issue has been with cable servings separating.
Which is a result of such a modern efficient and dramatic cam.
I have here a solution to these problems that will make the servings last their lifetime of the string, and have been asked several times lately for a detailed procedure.
*NOTE*-this is not a procedure association with any string manufacturer or a recommendation by them, and just a personnel solution I have used for many, many years as a Bow Tech.
Step 1
While bow is in press, I always check the inside top edge of the cam and/or idler string track [groove].
If there are any burrs or sharp edges [which can be done by a shooter bumping the cam/or idler on hard surfaces] I use a fine emery cloth [sandpaper/cloth] and carefully sand off any edges/burrs- then touch up with permanent black marker.
The two problem hotspots on stock strings/cables on many brand bows [and many custom strings/cables also] are the center and cam rollover serving wearing, slipping or creeping.
Which is an easy fix. Super Glue
Note* update..many new servings on newer model bows have an "bonding agent" on their servings...which may inhibit Super Glue or other "Cyanoacrylate" based glues from adhering properly.
Therefore string cleaners such as those from Scorpion String products may be needed to clean servings before gluing.
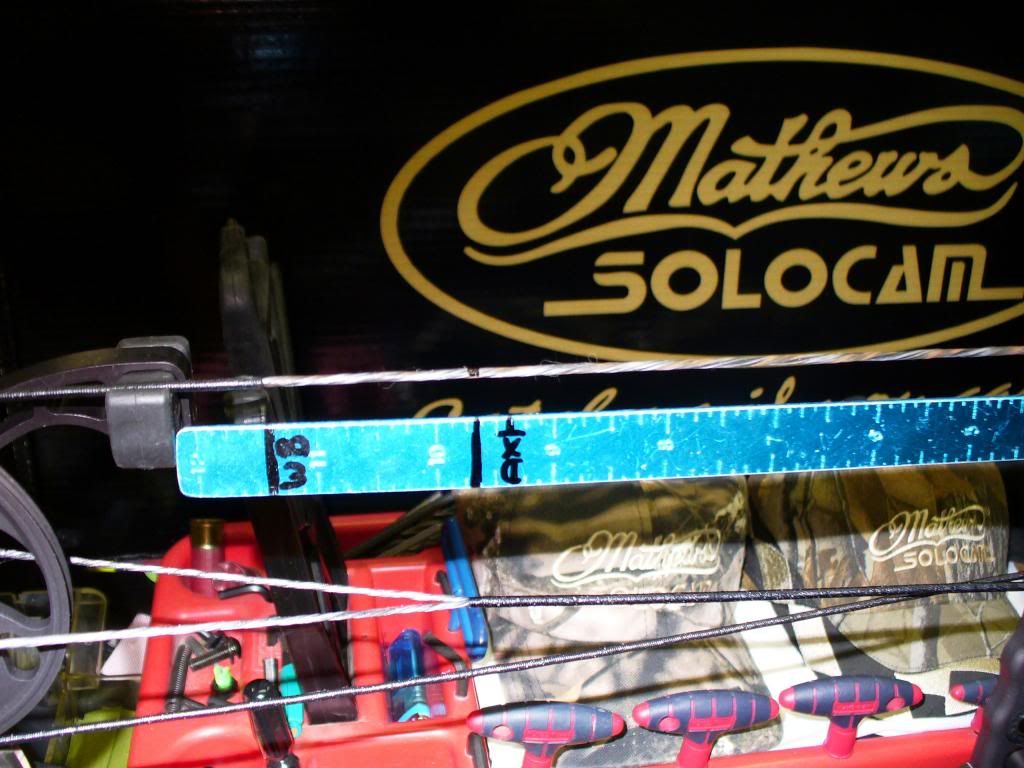
Pic #1 shows the 7 points on string and cable that should be glue for trouble free use.
Red arrows show points, Blue lines show area to be glued.
NOTE Awesome Mathews Custom string and Camo whiskers
PIC #1

PIC #2 Materials needed
-Super Glue, Bromnells Liquid Lok, fast fletch or other "Cyanoacrylate" based type glues.
-Small piece leather-one side smooth
-Paper towel
-Emery cloth
-String/serving cleaner

Simply- place paper towel under string servings near riser so glue does'nt drip on other parts of bow--- spread a thin layer of Super Glue on all 7 serving ends, one at a time--about an 1" -working it in all around string --let dry some--take small piece of leather and work in before completely dry
PIC #2-

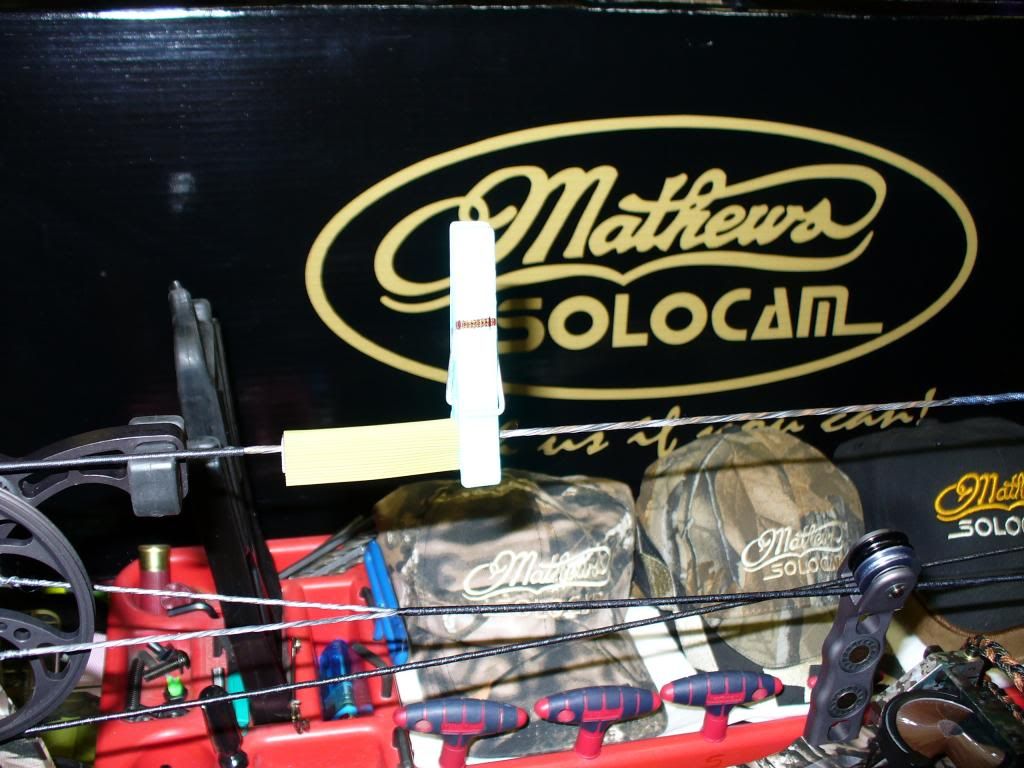
Pic #3 Red area shows area of cam rollover serving and top serving end to be glued-Blue lines show heavy roll over wear area.
PIC#3

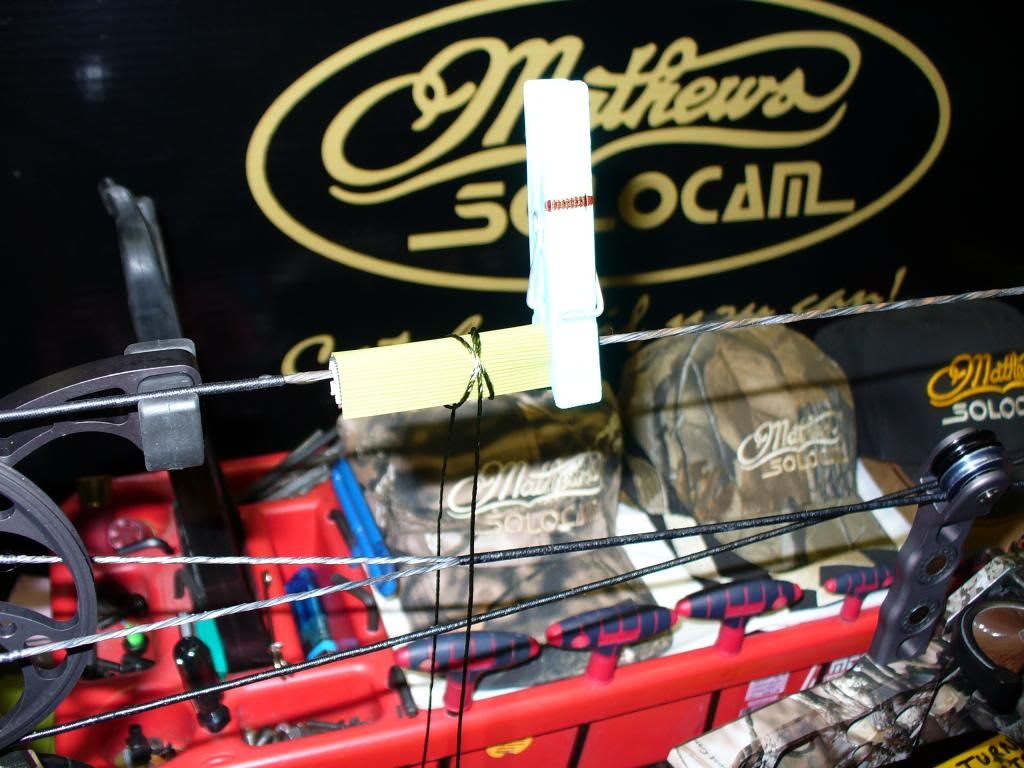
Pic #4 Red area shows center and Idler wheel serving ends than may be glued.
PIC#4

Pic#5 Red area shows 2 points of serving ends near Idler wheel and yoke that may be glued.
PIC#5

Pic#6 Shows gluing serving end- *Notice drip of glue on serving Do not let this happen and avoid over gluing" that was just due to the time of taking the pic by myself-glue should be spread thinly and evenly without excess dripping.
PIC#6

Pic#7 shows rubbing in glue like you would bow string wax.
PIC#7

*NOTE*--let glue dry some--take small piece of leather and work in before complexly dry
Use super fine sandpaper or emery cloth to lightly smooth if glue has dried a little rough.
-Super glue adds life to the cam rollover serving makes it last the life of string
-Really works great-lasts the lifetime of the string--if you want to remove a worn center serving use a solid pin to lift a stand of serving near nock point -cut- unravel to end- it comes off like a normal serving-re-serve.
-I have used this method since the invent of Super glue[ "Cyanoacrylate" based glues] and yet to have seen one ill effect on servings or strings of any material-other than some complained that it was a little harder getting the old serving off :whistle ... that the whole idea.
Results vary for some, pending on procedure, many praise the technique, others dont care for it, it was featured in Bowhunting World Magazine and Tech talk by Norb Mullaney and other publications on the net.
Try it you wont be disappointed and have nothing to lose
Neil
__________________
APA AIR
|
01-24-2013, 01:35 PM
|
|
|
|
Join Date: Dec 2012
Location: Wainwright
Posts: 4,499
|
|
__________________
APA AIR
|
01-25-2013, 08:50 AM
|
|
|
|
Join Date: May 2011
Location: Lethbridge
Posts: 261
|
|
Good stuff Neil. Another resource is the Nuts and Bolts of Archery that is available free on AT. I have posted a link for anybody wanting to download the free book.
http://archeryhistory.com/archerytal...of_Archery.pdf
__________________
If I am not hunting, then I am planning my next hunt!!
|
01-25-2013, 10:11 AM
|
|
|
|
Join Date: Dec 2012
Location: Wainwright
Posts: 4,499
|
|
yes thanks for that LA_bowhunter..Nuts and Bolts does a good job over there...
Neil
__________________
APA AIR
|
01-25-2013, 10:13 AM
|
|
|
|
Join Date: Dec 2012
Location: Wainwright
Posts: 4,499
|
|
__________________
APA AIR
|
01-25-2013, 10:18 AM
|
|
|
|
Join Date: Dec 2012
Location: Wainwright
Posts: 4,499
|
|
BROADHEAD TUNING

__________________
APA AIR
|
01-25-2013, 10:24 AM
|
|
|
|
Join Date: Dec 2012
Location: Wainwright
Posts: 4,499
|
|
STRING LOOPS
Most string manufacturers are now serving the loop ends...however unfourtunately some string makers still dont serve the end loops and it is a pain to work with when replacing strings...
simple solution to making work easier is just twisting the loop into itself. keeps strands equal and makes sure all strands in loop are used for install.

Neil
__________________
APA AIR
|
01-25-2013, 10:29 AM
|
|
|
|
Join Date: Dec 2012
Location: Wainwright
Posts: 4,499
|
|
WHATS YOUR LOOP TELLING YOU?

If ithe loop is deformed, then your D-loop is not in the
center of the pulling area and thus, your nock travel
is being thrown off; along with the stability of the
arrow and your holding ability! If the D-loop is angled
up from center, move the loop down slightly (not
much) on the string and visa versa.
The Center loop is what your loop should look like after shooting
Neil
__________________
APA AIR
|
01-26-2013, 01:12 AM
|
|
|
|
Join Date: Apr 2011
Posts: 234
|
|
Quote:
Originally Posted by L.O.S.T.Arrow

STRING LOOPS
Most string manufacturers are now serving the loop ends...however unfourtunately some string makers still dont serve the end loops and it is a pain to work with when replacing strings...
simple solution to making work easier is just twisting the loop into itself. keeps strands equal and makes sure all strands in loop are used for install.
Neil
|
Here is another method used by a lot of custom string builders called Tag Ends. Tag ends use the ends of the strings to close the loops. The tag ends are actually stronger than a served loop and when I am pre-stretching my own strings the tag loops loose less poundage then when I serve. This isn't too common North of the border so thought I would post up in case guys run into it at some point.
|
01-29-2013, 08:29 AM
|
|
|
|
Join Date: Dec 2012
Location: Wainwright
Posts: 4,499
|
|
Quote:
Originally Posted by HoytAlpha35
Here is another method used by a lot of custom string builders called Tag Ends. Tag ends use the ends of the strings to close the loops. The tag ends are actually stronger than a served loop and when I am pre-stretching my own strings the tag loops loose less poundage then when I serve. This isn't too common North of the border so thought I would post up in case guys run into it at some point.
|
Interesting..Thanks for that..
Neil
__________________
APA AIR
|
01-30-2013, 10:06 AM
|
|
|
|
Join Date: Dec 2012
Location: Wainwright
Posts: 4,499
|
|
Walkback Tuning Diagram.......Modified Close Method.

Neil
__________________
APA AIR
|
01-30-2013, 10:11 AM
|
|
|
|
Join Date: Dec 2012
Location: Wainwright
Posts: 4,499
|
|
Proper Bow Hand Placement/Grip
This stems from a recent post on paper tuning and a left tear...
We found That hand torque or bow torque was the biggest culprit to the dreaded left tear...as mentioned above start with arrow centered on berger and arrow 13/16 from riser On center...
Than concentrate on bow hand placement release and follow thru...
Practise hand positions below..totally relax bow hand...if necessary to keep bow from swaying with relaxed hand one can tuck your two smallest fingers in lightly against riser instead of the complete open hand...
] 

Practise a slow clean release...slowly squeeze release and it should almost be a surprise when it goes off...
exaggerate the follow thru ..let top of bow fall forward after shot in still relaxed hand...
We have cured many left tears and inconsistant shooting just by simply following these pointers, proper hand placement and grip...
JMHO
Neil
__________________
APA AIR
|
02-11-2013, 11:36 AM
|
|
|
|
Join Date: Dec 2012
Location: Wainwright
Posts: 4,499
|
|
Q&A and Opinion regarding The Whisker Biscuit
this was from a related post on another thread...
Quote:
Originally Posted by Mike_W
.
I don't know if whisker biscuits have changed and to be honest I haven't shot one since I switched to blazer vanes but with regular 4" vanes I can remember some streaking and warping .... Has this changed? Also I would be curious if anyone has done a speed test with and without the whisker biscuit on the same bow and what the impact on speed was shooting through the whiskers?
Mike
|
Quote:
Originally Posted by L.O.S.T.Arrow
They have changed a bit..lighter and tougher for sure...The new Balistic Power shot Features the NEW Ballistix CoPolymer System which is 25% lighter and 300% stronger than previous models..
there are/was differtent Blazers some were high profile while the original and the latest are lower profile that work very well pending on fletching set...meaning Helical is harder on vane than offset...
We still use the 4" duravane Savage vanes...they were made for the Ugly Cookie [WB] and last thousands of shots with not wrinkles or warping...the make of the vane was the key...the stiffer vanes dont do that..softer vanes are more prone to issues...
A well tuned bow is also the key...
A note on speed loss this is post we had a few years ago...
No doubt those that like the WB, like how easy it is to set up and how quickly they are able to get good arrow flight.
Many like the full containment feature of the rest and the fact that they are not likely to have their arrow fall off from their rest at the moment of truth and they are willing to sacrifice some arrow launch velocity to have this feature...Best hunting rest hands sown IMHO
On the other hand the more experienced archers seem to gravitate toward rests that do not tend to reduce the launch velocity of their arrows when their bows are properly tuned.
We recently did some testing designed to determine how much the WB affected
Arrow launch velocity and found that there were a number of factors that had an influence on the arrows launch velocity when the WB was used.
The WB tested had arrow entry in the 4th. quadrant and was composed of two different bristle colors. The bristles that supported the arrow on the sides and above were brown in color and measured about .008 in dia. The bristles that supported the bottom portion of the arrow were black in color and measured about .010 in diameter.
The circular opening in the center of the WB measured .314 in diameter ( a .315 dia gage pin would not slide through the opening under its own weight.)
The chronograph used to measure arrow velocities was capable of measuring the launch velocities of the arrows tested to less than 0.25 fps accuracy, verifiably.
We shot a number of different diameter arrows and we shot arrows having different types of fletching. The idea was to determine what effect arrow shaft friction played in reducing the arrows launch velocity and also to what extent did the arrows fletching contribute to the loss in launch velocity.
The bow that was used in the test was machine shot from exactly the same draw length for each shot and the nocking point travel was straight line in both the horizontal and vertical planes which should have minimized the force variations exerted on the O.D. of the shaft during launch. ( ie: the bow was well tuned)
All of the fletched arrows that were shot were fletched straight offset and the fletching was oriented such that each of the three fletch passed thru the brown bristles.
Conclusions:
1. When the arrow shaft diameter is only slightly larger than the W.B. opening, the velocity loss was 3fps of which a little over 1fps was due to shaft friction.
2. When the arrow shaft diameter is .015 to .020 less than the W.B. opening the velocity loss was about 2fps. With the 3 vanes showing slightly less loss than the 4 vanes. (less than .5fps) and the 5 feathers being in between the two.
3. The velocity loss is proportional to the degree that the arrow shaft is larger than the natural opening size of the W.B. There was a velocity loss if 4.6 fps when the shaft was about .085 larger, resulting in loss due to shaft friction being almost triple that of an arrow properly sized for the W.B.
I have seen some posts on this forum where people have attributed as much as 5 fps or more velocity loss to the W.B. and I can see from our testing that such values could be possible. Especially if one considers the possible combination of a larger diameter shaft, 5 helical fletched vanes and a poorly tuned bow or a bow having less than desirable nocking point travel.
Neil |
Just to add...as mentioned good bow tune is the key..Set the Ugly Cookie [WB] arrow centered on berger or rest bolt insert on bows riser..centered 13/16 from riser...nock point 1/4 high from bottom of arrow on rest using bow square...tilt Cookie [whisker] sligtly back towards string at top of biscuit...[for optinim less noise]
ensure you can see daylight on top and the top sides of arrow on/in rest..we use large Cookies on standard hunting arrows
Assuming the rest of the bow is spec tuned the Wb is a quite and very accurate even out to 70 yards...
In the last several years...more due to outstanding tecnology with modern bows, rest and arrows than talent or skill I was lucky enough to shoot a couple of triple hoods at 20 yards with three consecitive arrows...
Just a testiment of the Whisker Biscuits accuracy ...

JMHO
Neil
__________________
APA AIR
|
02-22-2013, 02:42 PM
|
|
|
|
Join Date: Dec 2012
Location: Wainwright
Posts: 4,499
|
|
Topic on A shooters Effective shooting distance
Quote:
Originally Posted by SmokinJoe
I use a single pin for target shooting, mostly because I need to be able to make a precise off yard shot (eg 32 yards)
But hunting I use a black gold 5 pin site, it's very durable, and micro adjusts so I know my shots are dead on at 20 30 40 50. Now I disagree with most guys in what they say the acceptable distance is for them. Personally I have no issues stacking arrows at 50 yards. However I don't bow hunt to make amazing shots, I bowhunt to get close to the game. I like the feeling of a bull anything 15 yards away. So I set my limits at 30 yards. In my case I could probably use a single pin set at 25 yards and be just fine. But I believe practice at long distance is the best way to be accurate at close distance.
My thoughts have changed on my effective distance. I used to be that guy prepared to make a long shot. Maybe I still am, but this year I have really started re evaluating just what it is about hunting that keeps me out every day during hunting season and as soon as it's over I start preparing for next season, and realized it's the skills I have learned over the years, and with those skills came a greater respect for the animals I hunt. Now if I'm gonna take the life of this creature I want to feel like I earned every pound of meat it yields.
So to answer your original question, take the time to figure out what you want out of bowhunting. Your the only person you have to satisfie with your decision.
|
[QUOTE=L.O.S.T.Arrow;1860320] SmokinJoe ...some very good points there..when choosing a sight there is deifinatly that "I can shoot range" and that shooters effective range...
On our outdoor range, set up here at the 40 yd target...
I have BOO BOO the bear ...he is a 1/4 inch steel bear with a generous vital area cut out of it..

I ask the shooter what their effective Range is...most will say 60-70 yards...I say ok....move Boo Boo out to 50 and say shoot ba three arrow round at Boo Boo...

As you can see the vitals are very generous...most times the first shot is TWANG...second ..TWANG or many at least once out of the three...some three out of the three .. lol

We call these Boo Boo Flower's ...its what the shooters arrow looks like after hitting the steel Boo Boo...
so than I bring it up to 40...which Most will put the arrowws thru at 40...some will still hit Boo Boo...so I keep moving Boo Boo closer until the can put a group thru..at least one or two lol...
Than I say...This my friend is your effective range...
for most its 40 yards...for some its only 30 yards and they are shocked...they wasted some good arrows but learned something...everytime they hit the bear I remind them that is a wounded animal and would most likely it would be never found..Makes them think hard...
Just because one has a 70 yard pin and shoots out there it doesnt mean that is an effective range for that perticular shooter..
Neil
__________________
APA AIR
|
03-16-2013, 01:05 PM
|
|
|
|
Join Date: Nov 2012
Posts: 29
|
|
Lots of good info - thanks!
|
03-16-2013, 02:33 PM
|
|
|
|
Join Date: Dec 2012
Location: Wainwright
Posts: 4,499
|
|
Quote:
Originally Posted by Nytronut
Lots of good info - thanks!
|
...Thanks..am working on geeting missing pictures back
Neil
__________________
APA AIR
|
07-25-2013, 11:54 PM
|
 |
|
|
Join Date: May 2011
Location: whitecourt
Posts: 1,293
|
|
Neil, you are a machine! This is a great information thread. This is the knid of stuff that should be in the forum more often. Thanks for the great share!
This is "sticky worthy". Again, good stuff!
Norm
|
07-26-2013, 10:19 AM
|
|
|
|
Join Date: Dec 2012
Location: Wainwright
Posts: 4,499
|
|
True Bow Draw Length
L.O.S.T. Arrow Archery
A proper draw length is so important to shooter form, comfort accuracy and consistency.
Recently I have some new shooters call in with a order for a bow at a certain draw length.
As some of the bows are cam and draw specific I asked how they knew their draw
Over the years I have seen some strange draw lengths on a bow
the worst coming from box stores or bought used bows by the shooter, shooter drawn with string behind ear, or even on that was so short the shooter and would touch the knuckle of the thump to bottom jaw just to touch his face somehow
String arm slap, Jerky anchors at draw, poor accuracy and consistency, uncomfortable draw and hold
list goes on all cases of the wrong draw
15 years ago over half the shooters had way too long of draw for them
Now draws are mostly still too long if not right, most are closer.
Back in the day Draw Length was the distance from the nock point to the throat of the grip plus 1 3/4". Typically, this length was also about the same length of arrow needed by the compound archer with earlier bows.
The 1 3/4 was the standard to the front of the riser with the above measurement and shooters cut arrows past riser for broadhead clearance on riser and due to safety with the touchy rests of the day
Today at full draw from the Berger button [rest bolt insert in riser] or throat/valley of the grip is your draw, however one has to find that comfortable draw, that allows not only the best comfort but best accuracy and cosistancy, now how do we find that true draw for you, I myself prefer to have the shooter draw bows at the shop and with different draw lengths, when they feel the most comfortable at draw
we are close.
Now I can tell if a shooters draw is too long or too short by simply standing behind them and watching them draw, the draw arm will tell me instantly if too long or too short, one has to also figure height, weight, muscles, body shape into the factor, but that comes natural after a long time.
Here are the most popular methods of finding draw lengths..
Wingspan
Someone figured out somehow that your wingspan is your height, then someone else figured out a few formulas that get you close to a draw length
To measure your draw length, stand with your back to a wall stretching your arms out against the wall. Measure the distance from the end of your middle finger to the end of your other middle finger, basically the length of both arms, hands and chest. This measurement, minus 15 then divided by 2, is your draw length.
Since your wingspan typically is the same as your height in inches, your height in inches minus 15 and then divided by 2 will be your draw length, or at least a very good starting point
Or
The more modern method has been
Next, take your wingspan measurement and divide it by 2.5. This will give you an excellent starting point for finding your proper draw length. However, variations in D-Loop length and axle to axle bow length may require some small lengthening or shortening of your final draw length measurement.
I personally found that dividing your wingspan by 2.6 was actually closer
Resist the temptation to make your draw length longer than it should be, as this will affect your accuracy.
Yardstick wall draw
Personally I used yet another method if the shooter wasnt present
simply Make a fist with your bow hand and touch it against a wall straight out to the side of your body as if you were shooting a bow. While you stand straight, in a good shooting posture, like looking down an arrow on bow, Use a yardstick against the wall to the right corner of your mouth or have someone measure the distance from the wall to the corner of your mouth. The length you come up should be close to your actual draw length
And this method was closer to many bow brands and their determined draw even today.
Will a string loop change my draw length?
Since the draw length is the distance from the nock point to the throat of the grip plus 1 3/4", adding a string loop cannot change the bow's draw length. BUT, it will change your anchor point moving it back 1/2" to 3/4". This will make it feel like your draw length is longer. If you want your same anchor point, then you will need to shorten the bow's draw length by about a 1/2" to move your anchor point back up to your preference.
DETERMINED WINGSPAN CHART
Wingspan | Draw Length
63" 24"
64" 24 1/2"
65" 25"
66" 25 1/2"
67" 26"
68" 26 1/2"
69" 27"
70" 27 1/2"
71" 28"
72" 28 1/2"
73" 29"
74" 29 1/2"
75" 30"
76" 30 1/2"
77" 31"
On draw.. Holding steady sounds like it is something you do by consciously tensing or tightening up your holding muscles really tight so as not to let the bow or sight move.
Actually, holding steady is accomplished by using proper form and then relaxing as many muscles as possible. If your draw length is not correct you cannot use the required proper form and relax the muscles, hence the bow is uncomfortable.
When you shoot a draw length that is too long you have to make the distance from your bow hand to your release hand longer than normal so it fits the bow. This is done by pushing or extending your bow shoulder forward and/or anchoring farther back with your release hand. When you extend your bow shoulder you will be using muscles to hold that shoulder in that extended position. the use of these muscles will cause more bow movement than if they were relaxed
hence accuracy and consistency is affected.
And that is one reason you may want to shorten your draw length if it is more than about ½ inch longer than indicated from the Wing Span method of determining draw length.
Now nothing is more accurate than visiting a PRO shop with a certified coach/instructor and shooting a drawing an actual bow in different draw lengths, with assisted help on form and finding the most comfortable
than accurate draw.
You will find some of these methods will vary slightly from each other... but again this is to give you a "Close" determination.
Sorry if this was so long, lol
Neil
__________________
APA AIR
|
07-26-2013, 10:30 AM
|
|
|
|
Join Date: Dec 2012
Location: Wainwright
Posts: 4,499
|
|
Quote:
Originally Posted by normanrd
Neil, you are a machine! This is a great information thread. This is the knid of stuff that should be in the forum more often. Thanks for the great share!
This is "sticky worthy". Again, good stuff!
Norm
|
Thanks for the kind words Sir...Just trying to help out..
Neil
__________________
APA AIR
|
07-26-2013, 10:48 AM
|
 |
Moderator
|
|
Join Date: Jul 2008
Location: A bit North o' Center...
Posts: 11,160
|
|
Great idea with Boo Boo... A pricey lesson to learn!
|
07-26-2013, 01:45 PM
|
|
|
|
Join Date: Dec 2012
Location: Wainwright
Posts: 4,499
|
|
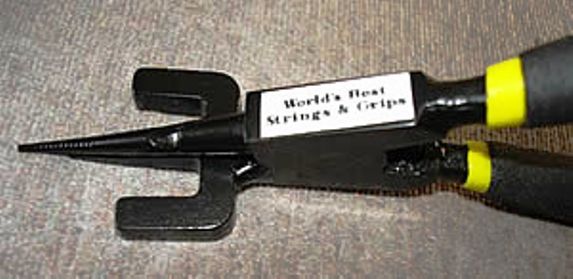
Proper way to tie a loop
Found the Pics to update this ...
I bought these Nocking Pliers from Worlds Best Strings...they put on 3000 lbs pressure on the loop...tie as close to string as possible...use pliers and loop pre stretches to 1/2" and doesnt strech anymoe...and will not move or slip...
NOTE* Loop may have to be cut off string to remove !!
Neil
__________________
APA AIR
|
07-30-2013, 03:48 PM
|
|
|
|
Join Date: Dec 2012
Location: Wainwright
Posts: 4,499
|
|
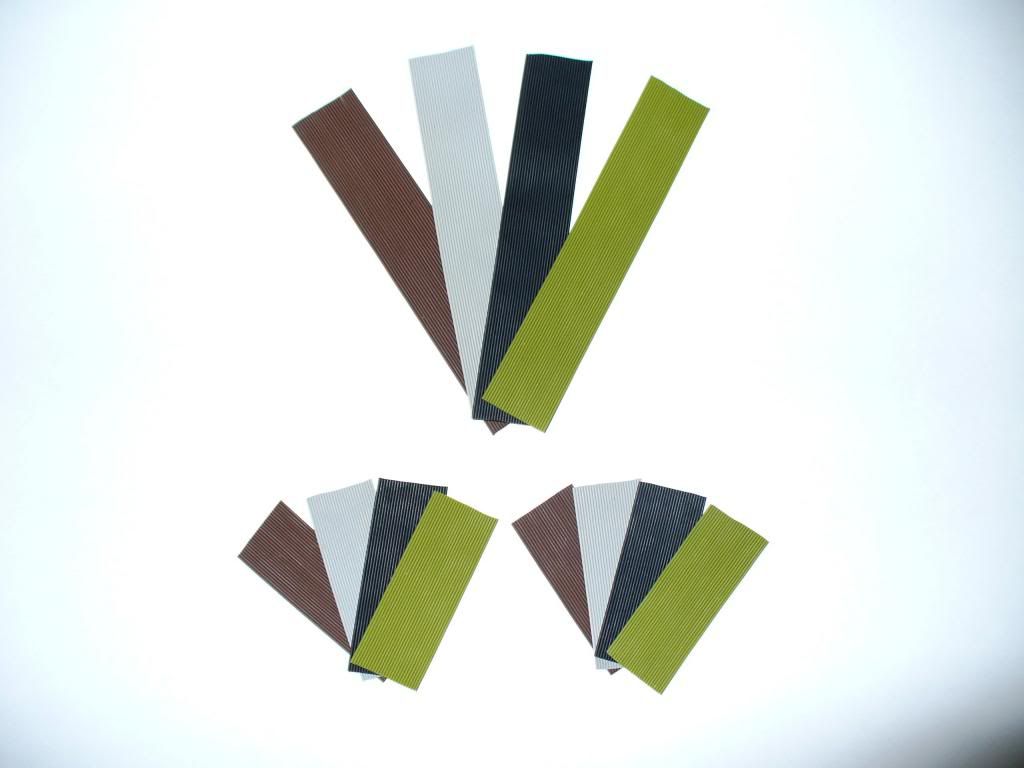
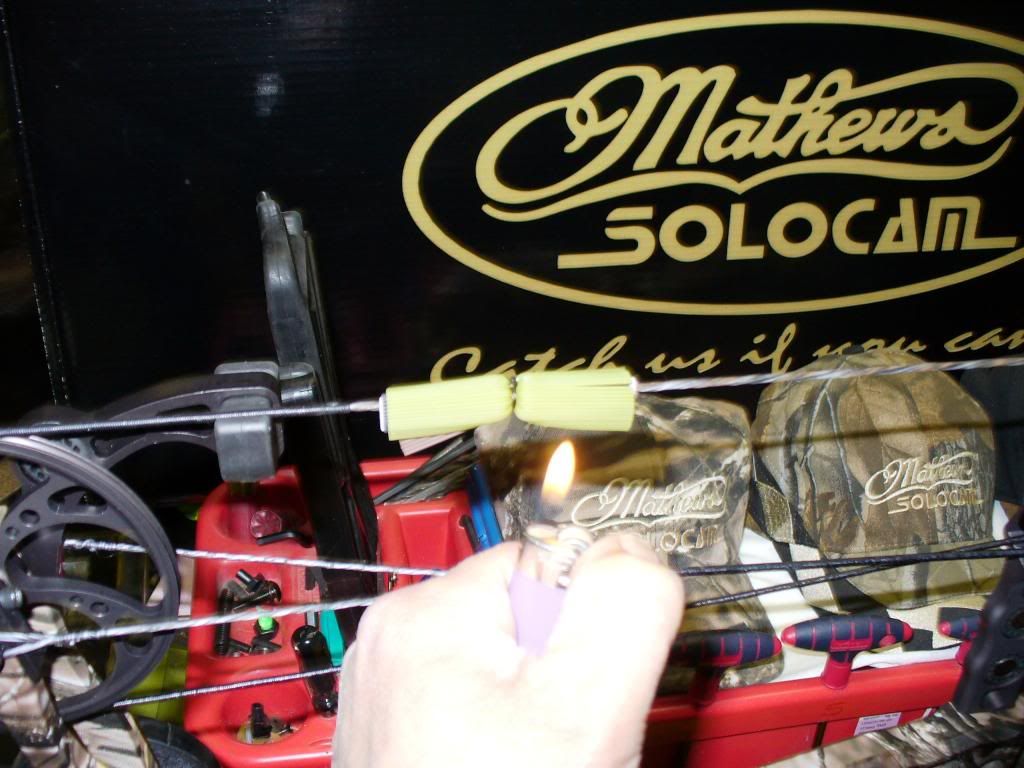
HOW TO INSTALL STRING WHISKERS
*insert...was asked for an update on this and with pictures as old pictures were nuked..
Neil
*********************************************
Hey folks, I have seen a lot of questions lately on whisker type string silencers, do they work, how to tie them, where to tie them etc, so I will try to answer some of those questions.
Whisker type silencers are not for everyone, you wont see them on most target or 3D shooters bows, and/or on the Speed Freak hunter bows either
The reason being is they will cause a few feet per second loss
do they work well enough-to compensate for speed loss?...all my personal bows will always wear them, however I am into power hunting, where silence over weighs a couple feet per second any day.
Also most bows can be tweaked also to make up that few feet per second loss easily, so you lose nothing and gain stealth.
There are other types of string silencers on the market, however they have the same speed loss and break very quickly.
Mathews Bows for example are already extreme quite with their built in string suppressor system, grub, Monkey Tails, etc however with a set of whiskers a shooter will hear an extreme difference again
..Pure stealth.
If you think you dont need them, try them, then decide.
The whiskers I have in stock are custom made and hands down are the best in the archery industry; they are designed with strength for todays modern fast bows.
The older type whiskers on the market start breaking in little as a dozen shots; where as these Whiskers will last the lifetime of the string, they are tuff and durable.
The whiskers sold by most companies if you can find them usually come in only Black, I had mine done for the shop in bulk custom colors, black, green, brown and gray.
When bought by the package most will come by the pair approx 5 inches long, I sell two pair per pack and use two pair for my whiskers, I cut the 5 inch in half and use four 2 inch strips for each of my whiskers.
1-2-3 or 4 strips may be used, the more you use the more effective they are and complete a fuller whisker.
The whisker will sit approx 2 from top cam/Idler wheel and 3 from bottom Cam, with the shorter bows the whiskers need to sit higher which allows a clear sight pin view without obstruction, longer ATA bows can be set lower, just make sure a clear view of sights is clear at full draw.
The further away from the Cam/Idler the quieter, however one doesnt want them too far toward center as that will add to speed loss, on Mathews We remove the Grub @ 33 Gr and add Whiskers @ 33Gr
no speed loss.
Many bows come served near idler wheel or top cam, If the serving is not long enough I suggest serving string where Whiskers will sit to prevent wear on string with todays fast bows
almost all bottom strings near cams due to dead stops and are served plenty long enough.
We now only use a material called Super Tack to tie on the whiskers it is a 3/32 flat nylon cord that is waxed
It reminds me of sinew
This is the black we have and also use the white..
It is very strong
up to 100 lbs strength
It is used a lot in furniture repair shops and Parachute equipment..
I used it for taxidermy...stitching up cape cut on the deer hide when mounting
The amazing factor is it ties easy and really cinches up with the Constrictor knot...best point is it tacks or sticks its self to its self for a knot that will never loosen up
and the cut end can still be melted to each other
With this material tie the Constrictor knot.. one more simple knot to finish and melt, the white can be colored any color with a permanent marker.
Caution* It is suggested to use leather gloves to tighten knot severely.
I have measurements for certain bows on different bow squares,
measure and mark string on serving
This is where your tied in whisker stop will seat and prevent whisker from moving downward when shooting, elsewhere they suggest a drop of Super Glue on string and slide the whisker into place, believe it or not I dont suggest it.
Tie onto marked serving using a Constrictor knot, a knot I use constantly in my Wilderness Survival Courses and other wilderness adventures
best and strongest outdoors knot going.
http://en.wikipedia.org/wiki/Constrictor_knot
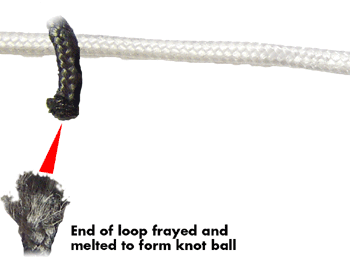
Finish Constrictor knot with a over hand knot and cut just under a 1/4 and with a butane lighter melt ends together and push into main knot body to form a melted locked knot.
Warning* Do not allow flame near string or allow knot material to burn close to string.
Fold Whiskers flat wise over string and use trusty plastic clothes pin to hold whisker on string
Tie whiskers on using constrictor knot and finish with the overhand knot cut and melt end as in tied stop.
Caution* It is suggested to use leather gloves to tighten knot severely again.
I have a ¾ and 7/8 inch mark drawn on my clothes pin, I use it to mark ends of whiskers to be cut-from center to both ends.
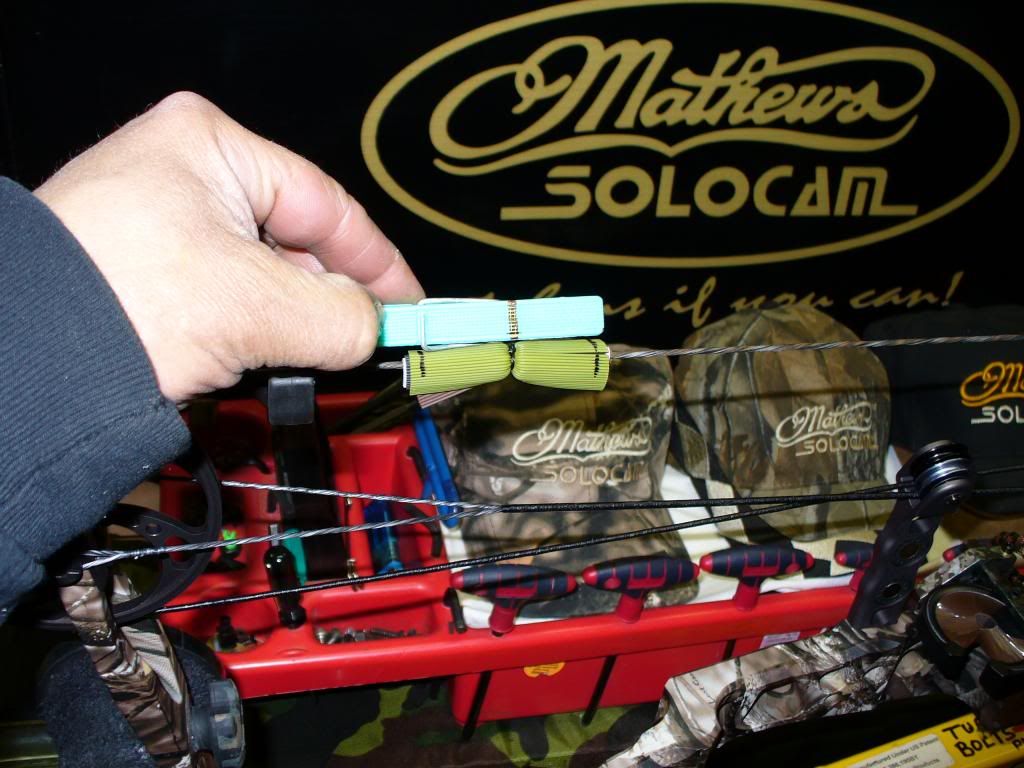
Then cut whiskers with sharp scissors
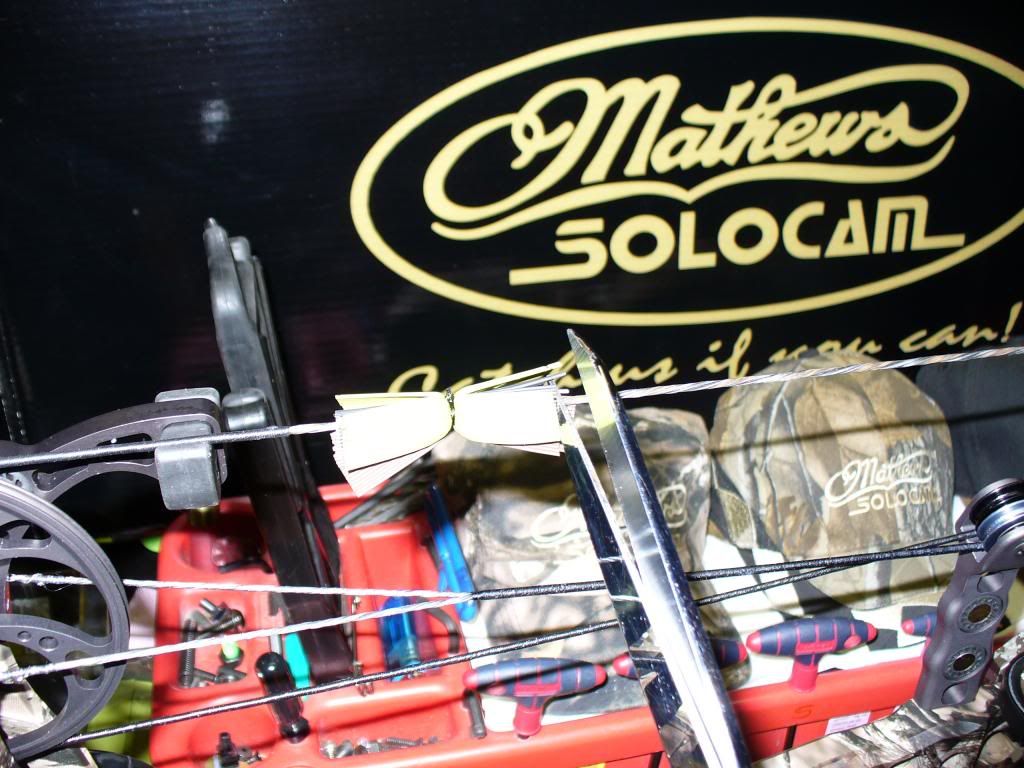
Then fluff whisker out by pulling on whiskers, most can be separated quickly just by pulling on both ends, whiskers will fluff even more after several shots.
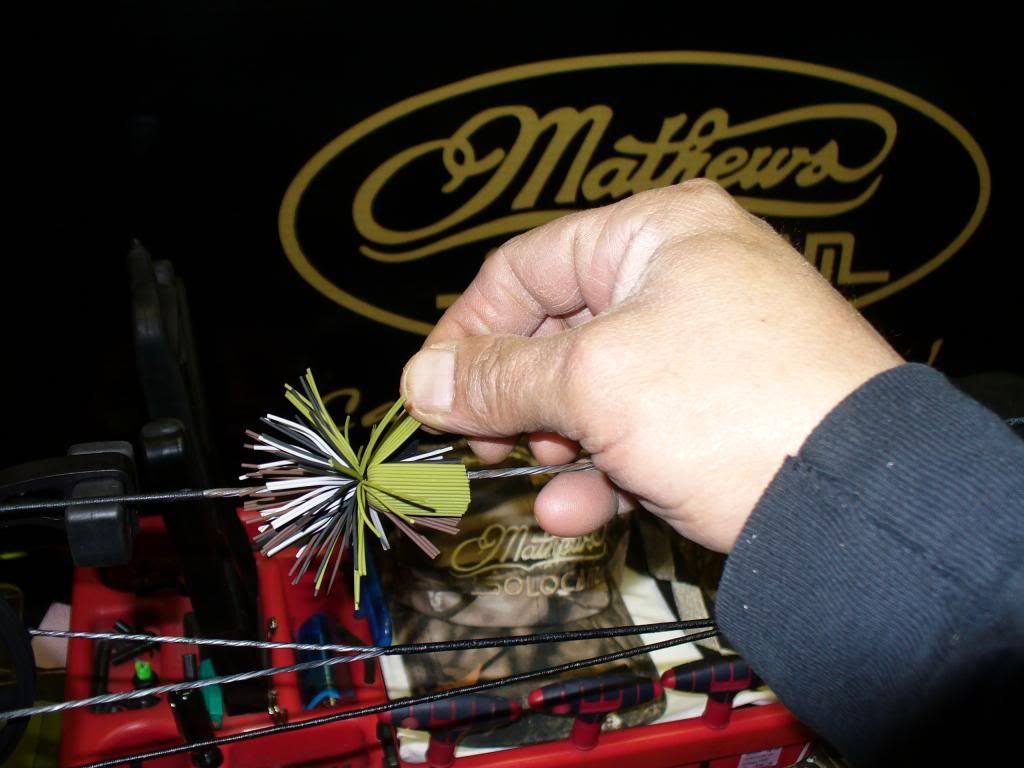
Use scissors to trim to desired size and even out, some may like the whisker that size or even trimmed down smaller, pending on the bow I like mine 1 ¼ to 1 ½ inch ball.
End results will be a trouble free whisker with many cobinations of colors that will last the life of the string, and considerably lower the bows noise that much more. And HEY they look good, make you look like a hunter not a gull-darn paper shooter ha ha.
Sorry about the quality of the pics-done them quickly by myself while installing a set of whiskers.
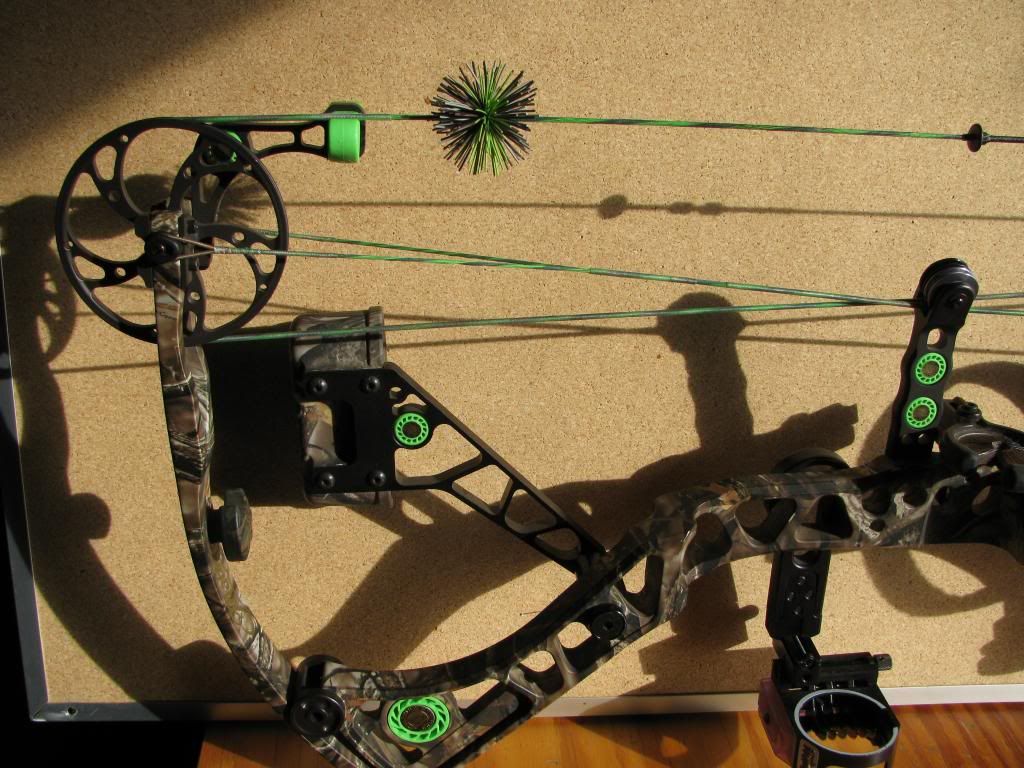
Neil
__________________
APA AIR
|
 Posting Rules
|
You may not post new threads
You may not post replies
You may not post attachments
You may not edit your posts
HTML code is Off
|
|
|
All times are GMT -6. The time now is 02:30 PM.
|


 Linear Mode

