 |
|

04-17-2011, 01:09 PM
|
|
Banned
|
|
Join Date: Jun 2010
Posts: 1,301
|
|
 Boat project update
Alright. Thanks to nate, i now have my livewell. its narrow, shortish and 32+ long on the inside. I discovered that there is definitely no way to put it between the consoles where i want it. So i have decided to build it into the back of the boat to make the livewell get a smoother ride and help me plane out batter. on either side of the live well at the back of the boat will be compartments for my battery and gas tank. The bow will still be framed in for storage. I think I am pretty much ready to start framing stuff in.
As for other issues on the boat, I am still having issues with the prop. i will probably solve those next weekend when the snow is melted. I think I will jjust pull the boat to a marine shop and get it figured out what I am missing for the prop. Im hoping im not missing too much. right now i am also having trouble getting the props on the shaft. I'm not sure why its so tight but ill get it figured out once i get all the parts.
I need to find a good battery to use as my starting battery. I have a deep cycle that i am going to be using for all my electronics. Thats the battery that i currently have that starts the boat but i dont fully trust it. so I am looking for a starting battery and then just use the crappy old one for all electronics.
so ultimately i really only have a couple things left to do. I did get lucky with the trailer being in such good shape but i think i will have a little work to do on that but it is a bottom priority right now. I am not sure if ill get it done for the 8th. im pretty busy as it is with finals and such.

|
04-17-2011, 02:07 PM
|
 |
|
|
Join Date: Dec 2008
Location: calgary
Posts: 1,117
|
|
So do you have any pics of your livewell?
__________________
You don't really know a person until you have hunted with them. 
|
04-17-2011, 02:24 PM
|
|
Banned
|
|
Join Date: Jun 2010
Posts: 1,301
|
|
ill be taking lots as it gets built. none right now because nothing is installed. I will post pics as i go. Next weekend my priority is to finish up everything with the prop then pending how that goes start in on the framing. the framing wont take long. I have exams on the 27,28,29 . so that weekend and the week after will be the big push. right now im just collecting pieces.
|
04-17-2011, 02:56 PM
|
 |
|
|
Join Date: Nov 2010
Location: Edmonton
Posts: 2,499
|
|
Sounds awesome braun. I've been working on mine all day yesterday and today. 14' crestliner with a tiller motor. Framed the casting/storage platform yesterday and the bow motor mount with carpet. So far so good. Today I cut the platform sheathing and things are going smooth. I'll post some pictures tonight if I have time. No livewell for me but I'm moving gas and battery up front for weight.
I'm also putting in a floor all the way to the back and everything will have carpet. Can't wait to finish and try it out.
Hope your project goes smoothly.
|
04-17-2011, 03:02 PM
|
|
Banned
|
|
Join Date: Jun 2010
Posts: 1,301
|
|
ya all my designs are not final yet. Im debating weather to keep my battery at the back or to move it to the front. I will probably end up running 2 batteries. one strictly for starting and the other for electronics. then i have to face the decision of putting both in the back or the electronics one up front. I still have to find another battery. dont want to spend alot though which is nonsense when it comes to batteries cause they are ridiculously expensive
|
04-17-2011, 06:56 PM
|
|
|
|
Join Date: Nov 2010
Location: Edmonton
Posts: 2,499
|
|
Not sure what you want to spend on a battery but the Costcos in the Edmonton areas have group 27 120 amp hour deep cycles for $110.00. I know that ain't cheap but I have 2 on my fifth wheel and they work great.
I will be putting 1 or 2 in the boat depending on room and fit. Theres enough room for 2 but not much else.
I just glued in the carpet on my casting platform. Now it needs to dry before I carry on. I don't want to mess something up while its still wet. Picked up some paint this afternoon for the outside too. Can't wait.
I needed my weight shifted up front, that was my reasoning plus I added a bow mount Minn Kota so it was easier to put them up front. I run my sonar off of a 7amp gel cell so it stays at the back.
Keep me updated on your project. Can't wait to see some pics.
|
04-17-2011, 09:02 PM
|
|
Banned
|
|
Join Date: Jun 2010
Posts: 1,301
|
|
where did you get your carpet? I havent picked up my carpet yet and i really havent looked. I know rona sells some at 60cents a square foot or something but I havent been there yet but I only saw the green stuff on the website.
ya, im going to have to swallow it at somepoint. I might be able to get away with the old battery for a little while. just got to be careful. also what did you use to glue your carpet down?
|
04-17-2011, 11:26 PM
|
|
|
|
Join Date: Nov 2010
Location: Edmonton
Posts: 2,499
|
|
I got my carpet at Rona. It came in a roll and was 8x12 for $62 i think, not green. Mine was grey and black and then I stapled some and glued some. I used the outdoor carpet glue from Rona. Around $28 for a gallon.
|
04-17-2011, 11:35 PM
|
|
|
|
Join Date: Nov 2010
Location: Edmonton
Posts: 2,499
|
|
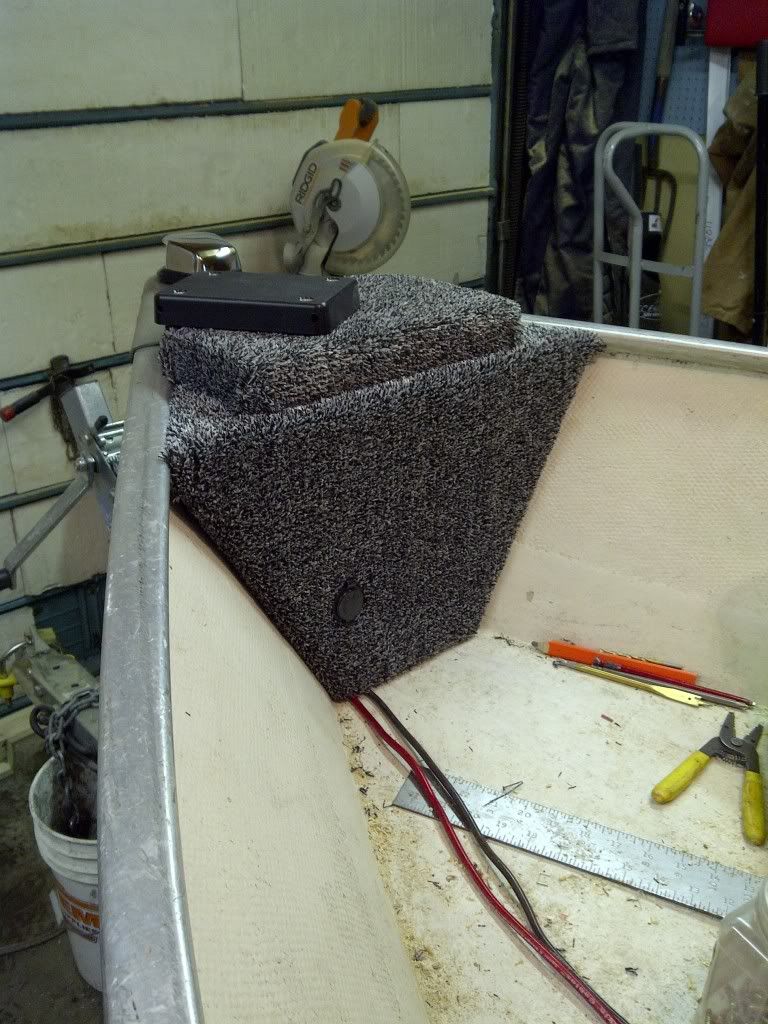
Here is the first dayof work this weekend.
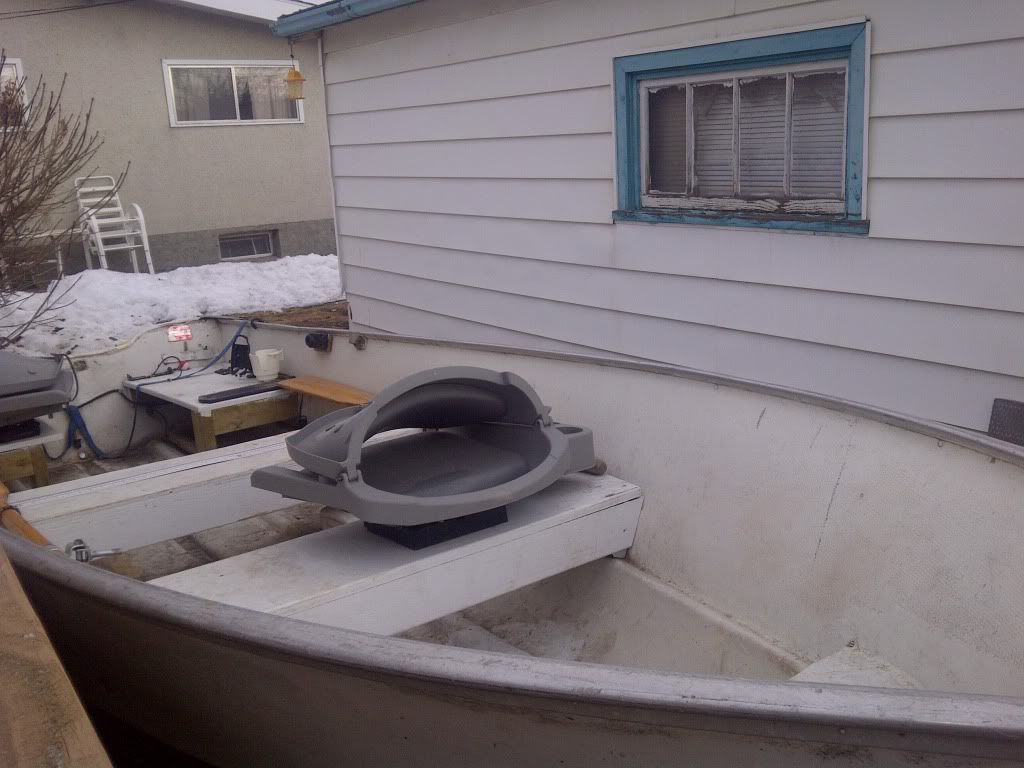
before

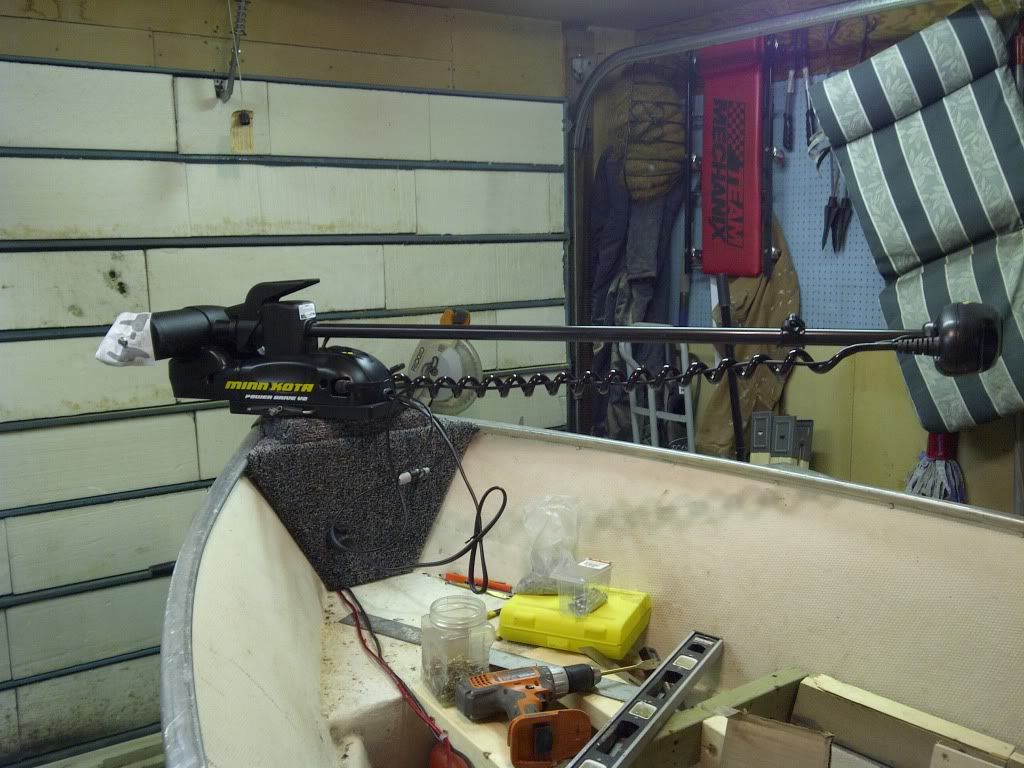
Motor mount
Motor installed
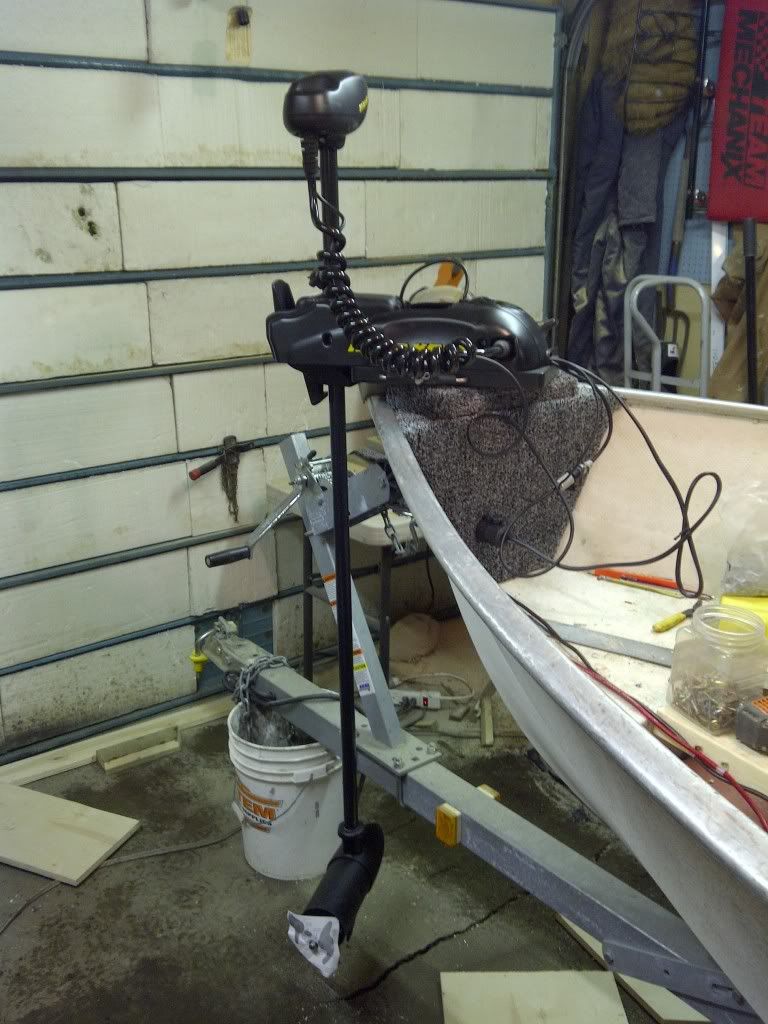
Motor deployed
|
04-17-2011, 11:37 PM
|
|
|
|
Join Date: Nov 2010
Location: Edmonton
Posts: 2,499
|
|
Day 2
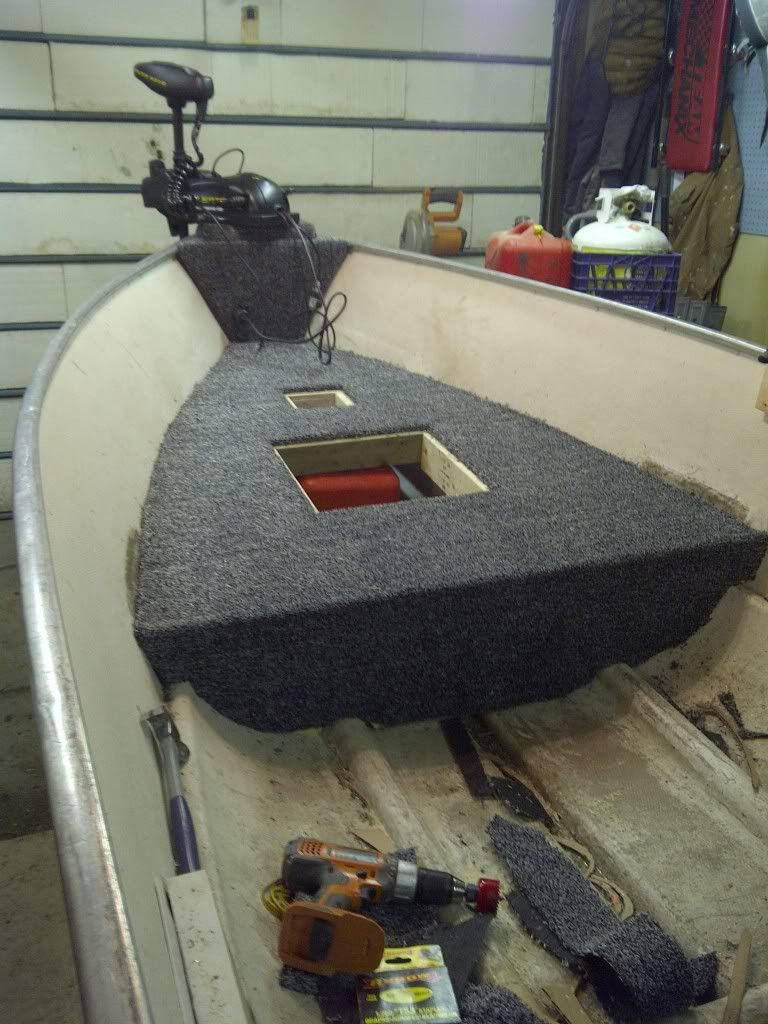
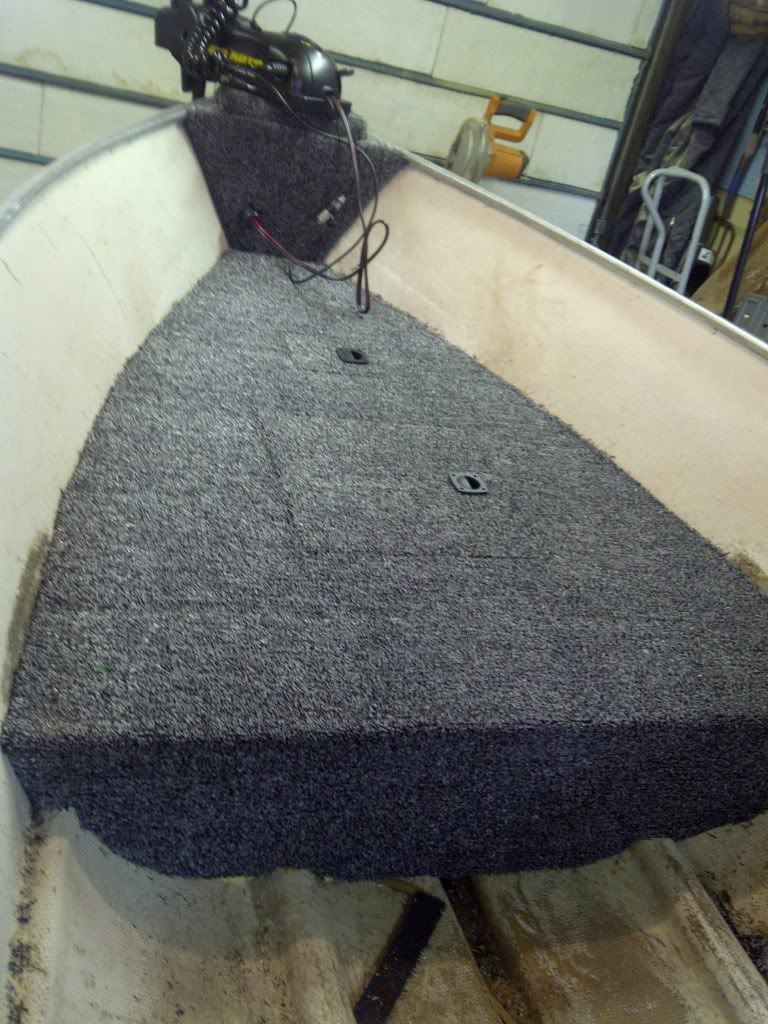
Casting platform
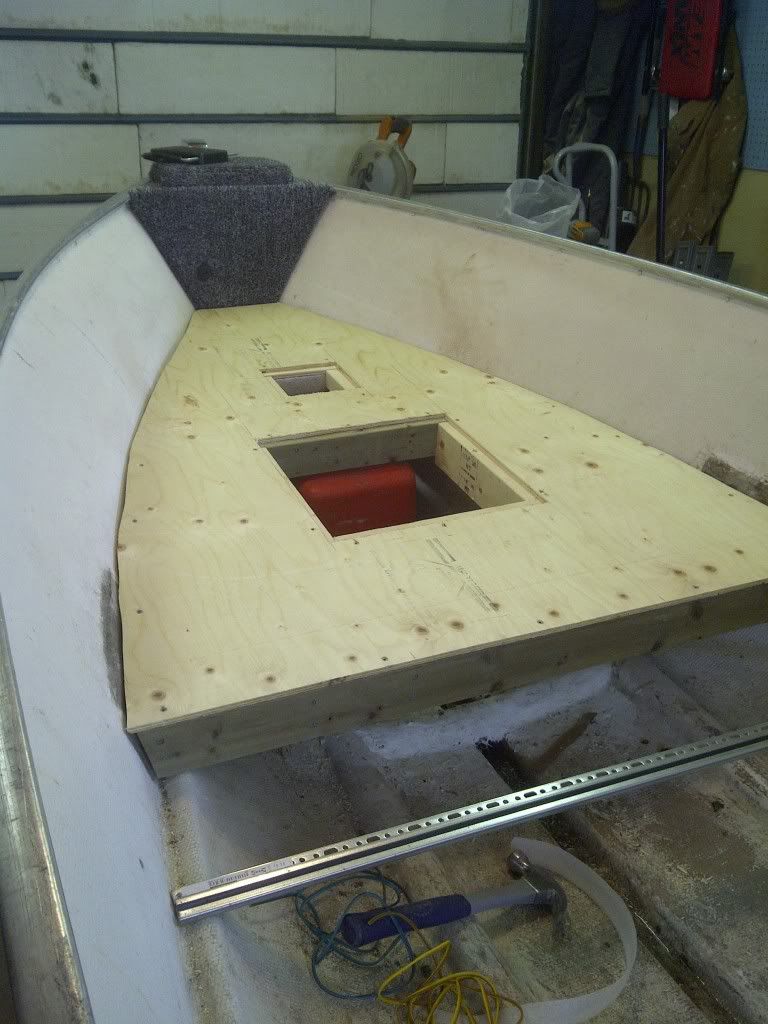
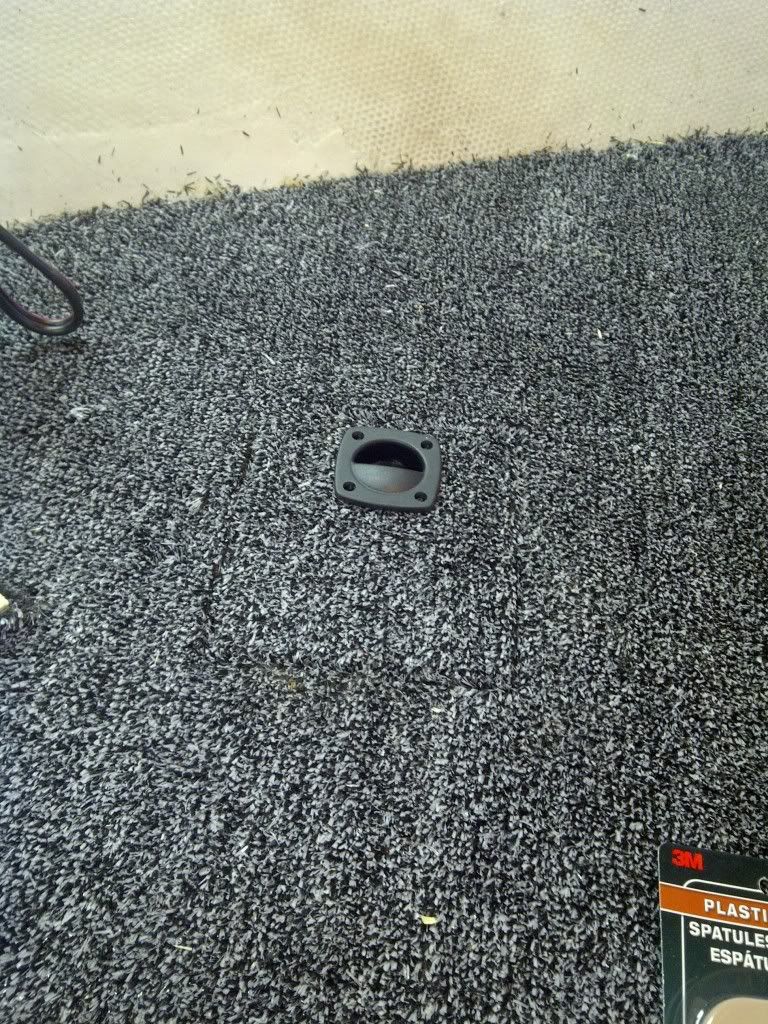
Gas Hatch
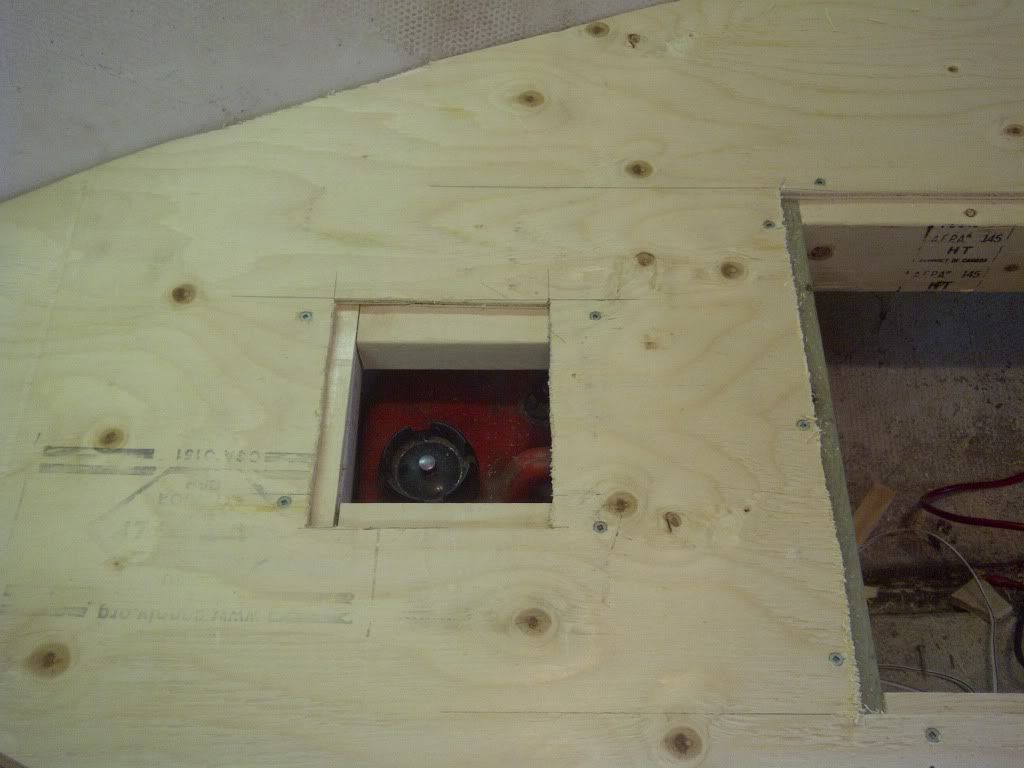
Ready for carpet
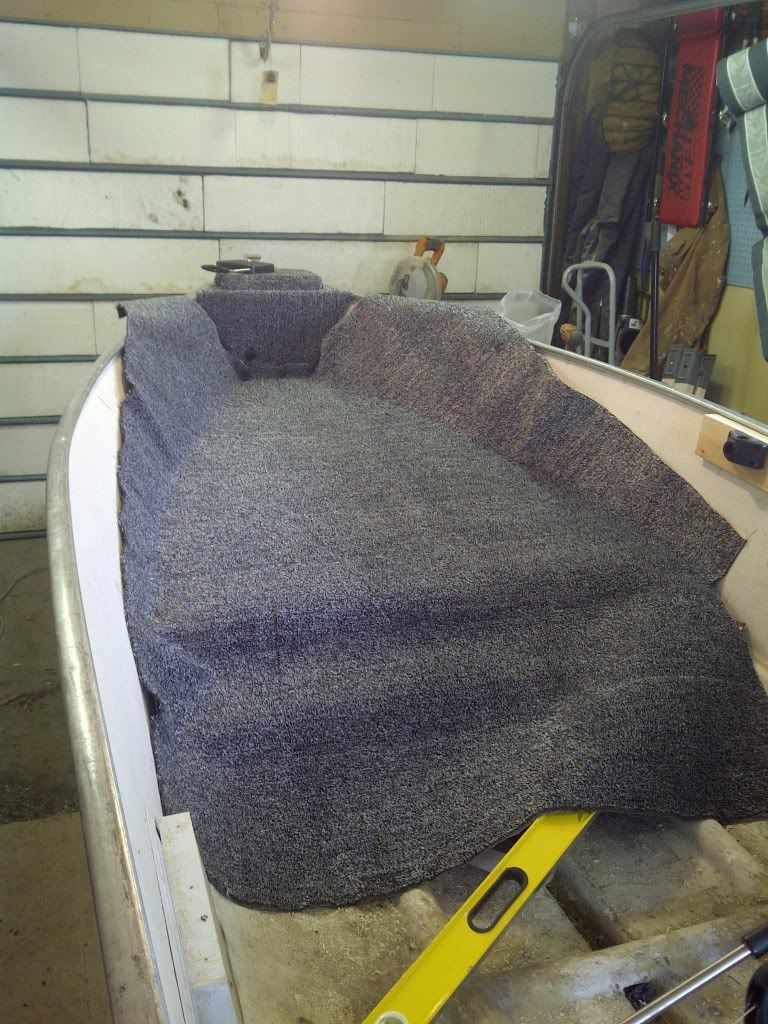
Another fine days work
|
04-17-2011, 11:43 PM
|
 |
|
|
Join Date: Dec 2008
Location: Lethbridge, Alberta
Posts: 4,063
|
|
Hey Willowtrail,
Are you going to be putting a removable seat mount on that front casting deck? That way when you are anchored up and there is a couple of guys on the boat there is plenty of comfortable seats to sit in.
The boat is looking good so far. Will be nice to see the finished product.
|
04-17-2011, 11:57 PM
|
|
|
|
Join Date: Nov 2010
Location: Edmonton
Posts: 2,499
|
|
Was going to just put these back on for now. May do something different after she hits the water.
|
04-18-2011, 07:32 AM
|
|
|
|
Join Date: Feb 2009
Posts: 132
|
|
Love it! Keep posting pictures and progress updates!
I need to do some repairs to my little boat this spring too. Likely going to be replacing the entire transom and probably doing something similar to what you've been doing, except on a smaller scale since its pretty tight quarters already in the little 11' fiberglass boat.
|
04-18-2011, 07:47 AM
|
 |
|
|
Join Date: Feb 2011
Location: Calgary
Posts: 1,769
|
|
Star Building had either half sheets or 3'x4' pieces of plywood for about $4. Can't remember the exact size or price. (403) 720-0010 is the phone #. On Blackfoot Tr., by the Brewery. Hope that can help.
|
04-18-2011, 07:55 AM
|
|
Banned
|
|
Join Date: Jun 2010
Posts: 1,301
|
|
lookin good willow. Its good to see pics of how your framing in you hatches. I was going to do something similar. My deck is slightly bigger and i was worried about sturdiness in the floor but now that im not putting my livewell up front its not an issue. your going to have a sweet rig when all is said and done.
|
04-18-2011, 08:30 AM
|
|
|
|
Join Date: Nov 2010
Posts: 1,854
|
|
That looks pretty slick!
Good job! 
|
04-18-2011, 10:20 PM
|
|
|
|
Join Date: Nov 2010
Location: Edmonton
Posts: 2,499
|
|
Day 3
Took it easy tonight after a busy weekend. Picked up some 3/8" gas line and ran the line down the keel of the boat to the back.
Also installed the 2 hatch covers, just need some stainless screws to fasten the catches.
Tomorrow I will do a little fiberglass work and start prepping for paint and try to get the floor started.
Hey Braun, on a side note, the carpet has a direction to it so be aware when you're carpeting your hatches.
|
04-18-2011, 10:33 PM
|
|
Banned
|
|
Join Date: Jun 2010
Posts: 1,301
|
|
lol that would be funny. I think lowes has outdoor carpet drastically cheaper what what you paid. not that im trying to make you feel bad. Im just a poor student so I am going to hunt down the best deal. you did a real good job with your hatches. are they hinged?
|
04-18-2011, 10:40 PM
|
|
|
|
Join Date: Nov 2010
Location: Edmonton
Posts: 2,499
|
|
I only used 3/8" plywood so it wouls be hard to hinge. Wanted to keep the weight down. Right now they are just pressure fit but I'm planing on using earth magnets on one side and a clip on the other side. I lucked out on my carpet and got 15% off on Saturday with the deal they had on.
I can't wait to get the next step done. Now I'm also thinking of closing in underneath the back 2 seats and add more storage. The possibilities are endless when doing a project like this. I'm just glad someone isn't charging me by the hour to do it. A new boat would be cheaper.
|
04-18-2011, 10:53 PM
|
|
Banned
|
|
Join Date: Jun 2010
Posts: 1,301
|
|
ya im glad that i can do everything myself as well. plus this way you can build it EXACTLY how you want it. Ya i have been going back and forth with the thickness of ply I want to use. i would like to have bigger hatches in order to get bigger stuff in and out so i will want to have something with some thickness. the other handicap I have is with the livewell hatch, its going to need to be 23 inches wide and like close to 40 long. i want to get access to the entire livewell. that is a big span to have no supports. But there shouldnt be anyone standing on it and shouldnt be anyone sitting on it either.
One option is to put a support ion the middle and cut the lid of my livewell in half so i can open half my hatch then open half the livewell. But like i said i want to access everything at times............ and while typing this i figured out a way to do it.... alot of work but it will give me the support i need without needing to cut my lid in half or do anything funky. hmmm. thanks for helping me work that out.....
too hard to explain, ill post pictures as i go
|
04-18-2011, 10:59 PM
|
|
|
|
Join Date: Nov 2010
Location: Edmonton
Posts: 2,499
|
|
When reading that I was figuring you could use steel to support the lid but do as you figured. Thats how my whole weekend went. If I was in a jamb, just sit back and it came to me. Don't over think anything, just get a rough idea and start and fly by the seat of your pants.
I can't wait to see your pictures. When are you starting?
|
04-18-2011, 11:14 PM
|
|
Banned
|
|
Join Date: Jun 2010
Posts: 1,301
|
|
well what i figured out is leave the lids in full pieces. It will make it nice and uncluttered. but what i will do is glue and screw 2 2x4 cross braces to my hatch lid and then notch out the tips of my braces to make them only an inch thick and then notch out my framing an inch. then my notches will fit right into eachother bracing across my framing in the middle of my lid. then when i open it, my braces are attached to my lid and out of the way giving me full access to my livewell without losing any support.
Well i have exams the 27, 2 on the 28, and the 29. I am a fulltime student (4 classes) and work full time (40hours/week) Im not taking any time off work for my exams (except the 28) and I admittedly am behind in my studies. Needless to say that school must be a priority till the end of the month. doesnt mean I wont work on it slowly but I'm try to avoid starting my framing because once I start I wont stop. I am getting all the little things out of the way though. After my exams its going to be all hands on deck... (ha) I would like to be done for the may 8th opener but it might not happen till the following weekend. But I would definitely expect to start seeing pictures of the construction no later than the weekend of the 30th
|
04-19-2011, 05:59 AM
|
 |
|
|
Join Date: Jan 2010
Location: Edmonton
Posts: 6,470
|
|
Make sure the gas tank area has some good venting of some kind. You dont need to be a fire ball on the lake.
|
04-19-2011, 11:03 AM
|
 |
Gone Hunting
|
|
Join Date: May 2007
Location: Between Bodo and a hard place
Posts: 20,168
|
|
x2 I'm glad someone mentioned that. It looks like you are putting fuel tanks in a closed area. It won't take much for it to fill with fumes on a hot day. a spark and you will have an airboat.
__________________
I'm not lying!!! You are just experiencing it differently.  It isn't a question of who will allow me, but who will stop me.. Ayn Rand
|
04-19-2011, 11:16 AM
|
|
Banned
|
|
Join Date: Jun 2010
Posts: 1,301
|
|
good point. mine will be well vented. not worried here.
|
04-19-2011, 11:21 AM
|
|
Banned
|
|
Join Date: Oct 2010
Posts: 6,408
|
|
Quote:
Originally Posted by Redfrog

x2 I'm glad someone mentioned that. It looks like you are putting fuel tanks in a closed area. It won't take much for it to fill with fumes on a hot day. a spark and you will have an airboat.
|
HOLY SHMOLY!!! Willow, seriously, cut a semi-circle out from where the carpet meets the keel, not higher, about 10" diameter and cut another vent hole right at the front of the bow. Also upgrade your tank. Put a rubber mat under your tank. If you got stopped on the water and they did a survey, your boat wouldn't pass.
|
04-19-2011, 11:26 AM
|
|
Banned
|
|
Join Date: Jun 2010
Posts: 1,301
|
|
Quote:
Originally Posted by GustavMahler
HOLY SHMOLY!!! Willow, seriously, cut a semi-circle out from where the carpet meets the keel, not higher, about 10" diameter and cut another vent hole right at the front of the bow. Also upgrade your tank. Put a rubber mat under your tank. If you got stopped on the water and they did a survey, your boat wouldn't pass.
|
hahaha. in all seriousness though, whats wrong with that tank, same one im using. actually I think that one is a new plastic one. mine is an old metal 20L. If your talking about it being plastic and under his deck where it is going to be scortching with no vents then ya, I might agree. mine will have lots of space and I will also be keeping a spare tank of gas in the front deck.
|
04-19-2011, 11:32 AM
|
|
Banned
|
|
Join Date: Oct 2010
Posts: 6,408
|
|
Quote:
Originally Posted by Braun
hahaha. in all seriousness though, whats wrong with that tank, same one im using. actually I think that one is a new plastic one. mine is an old metal 20L. If your talking about it being plastic and under his deck where it is going to be scortching with no vents then ya, I might agree. mine will have lots of space and I will also be keeping a spare tank of gas in the front deck.
|
His looks like an older metal one but in any regard, big vent right at the floor and draft points top-side on the deck.
|
04-19-2011, 01:02 PM
|
|
|
|
Join Date: Aug 2010
Posts: 132
|
|
its awesome to see others working on their rig this winter . I also was doing a lot of upgrades. Today , i get the last piece of the puzzle , my new steering wheel.
List of updates ( will post pics eventually )
New Gauges
New Steering Wheel
Hot Foot
Pro Trim
Blue Water LED Lighting kit
LED Trailer Lights
New Seats
Rod Holders for my lockers
Water Separator
I just need to give her a coat of wax before this weekend to BC ... You are right though , its so nice to be able to do things yourself. Save a TON of $$$
|
04-19-2011, 02:02 PM
|
|
|
|
Join Date: Nov 2010
Location: Edmonton
Posts: 2,499
|
|
So far nothing is air tight. I may change the front hatch to a gtate style if yoy guys are worried about it. The tank is a new 3 gallon plastic tank.
|
 Posting Rules
|
You may not post new threads
You may not post replies
You may not post attachments
You may not edit your posts
HTML code is Off
|
|
|
All times are GMT -6. The time now is 09:24 AM.
|


 Linear Mode

